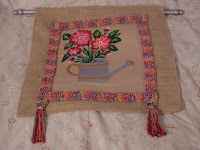
New:Handpainted Wallhangings
Introducing: Craftybegonia's
Handpainted Wallhangings!
To see them in more detail, please go to our gallery:
http://craftybegoniagallery.blogspot.com/2009/02/new-more-gorgeous-handpainted-wall.html
Chickie's Puzzle
I'd like to know how it happened.
I can't understand it a bit;
A moment ago I was curled up so,
There was naught I could do but pick.
So I picked and picked, and by and by,
There came a great crashing sound;
And first thing I knew the shell was in two,
And I standing safe on the ground.
Anonymous author of the 1800s.
Moral of Chickie's Puzzle:
Persevere, if it is somethig worthwhile,
don't give up.
Real love is one Person: Jesus! If you want to get to know Him better, there's no other book like Steps to Christ. A sweet, short, beauttiful book. Read it online for FREE, here: http://www.stepstochrist.us/
Block and Strip Crocheting
How to Make a Sweater Without a Pattern--Part 2
More than a pattern, I will give you a very useful formula that will enable you to make all kinds of sweaters and garments for yourself and for others.
You Will Need:
* Worsted weight yarn, colors of your choice, the sample used 6 solid colors and 1 matching variegated
* Size H crochet hook
* 1 pair of scissors
* 1 tapestry needle to join pieces
* 1 Measuring tape
* Brown paper
* Easy sewing pattern or personal garment
First, take a sweater you really love and which fits you well, or, if you are making it for someone else, take a garment from that person or purchase an easy sewing pattern for the standard fit of that person's size.
Cut out the pattern and transfer it to brown paper (trace it and cut it out), if you use a garment, trace the outlines of your garment and make a good skematic of it, with measurements and all, if possible. Next you will decide the size of your blocks, they could be small or large as in my example (this is a tunic I made as a birthday gift and the recepient loves it.)
Choose your yarn or thread and start making your squares, they could be grannies or textured
stitch blocks like the ones I made. Fill the space of your paper outline with the blocks, pinning them with pins in place, the outward side facing the paper. Then, join them together, the wrong side facing you, while they are still pinned to the paper. Once you have your garment in one piece, crochet the strips all along to fill the sides, the neckline and the back, the wrong side facing you.
With the sleeves you do the same, you make a paper outline of the sleeves that could fit you and your garment, fill that with blocks and crochet strips in between and if you want to, at the bottom as a loose "cuff."
If you want pockets, you make two squares, sew them together and just join them to the side strip at each side facing inward as you go about crocheting and joining them.
With this formula you can make a variety of sweaters.
If you want your tunic to have buttons, make buttonholes as you sc the front side strip. If you don't want to make buttonholes, make frogs and sew them to the front strip with nice knots or buttons on the strip opposite to it.
You can make many changes on this garment, you can make it shorter, to become a classic sweater, or longer, to turn it into a light spring coat.
Hope you can make a lot of beautiful sweaters using this formula!
Would you like to try this crafter's community?
MyHandmadeRegistry is a brand new social communty for crafters which rewards you if you promote it: http://www.myhandmaderegistry.com/profile/ClotildeM
I leave you with a bit of Inspiration:
"Once I thought to find on earth
Love, perfect and complete.
Now, I know it carries wounds
In its hands and feet."
--Anna Hemstead Branch
I am only one.
But still I am one.
I cannot do everything,
But still I can do something.
And because I cannot do everything
I will not refuse to do the something
That I can do.
--Helen Keller
Real love is one Person: Jesus! If you want to get to know Him better, there's no other book like Steps to Christ. A sweet, short, beauttiful book. Read it online for FREE, here: http://www.stepstochrist.us/
Craft Blogging in the New Century
Add this effect to your own photos
Aside from being a crafts lover are you also a Blogger? If you are, I want to provide you with a FREE list of useful tools that might help you optimize your blog even better. You might know some, and you might not know others. If you find this post useful, please pass it on by linking to it in your own blog for the good of others. These tools are considered by some to be essential, I consider them very useful. You might come to use them a lot. They are FREE, which makes them all the better.
Here they are:
The First one is Feedburner: http://www.feedburner.com/fb/a/home
This site generates a terrific feed that is compatible with all feed readers found for free online. It will also allow you to put easy subscribe buttons for XML, Add to yahoo, Add to Newsgator, Add to MSN etc. Read about how their single feed policy can benefit you. After you register, you can get from them a nifty chicklet button that willhelp you find out how many readers are you seen that particular feed to read your blog. You can also choose to have a headline animator that will display your last 5 posts in an animated form.
Bloglines is another site similar to Feedburner: http://www.bloglines.com/
SoloSub,RSS & ATOM Feed Subscription Made Easy: http://solosub.com/
So, if you have a great blog and now you know how to manage RSS and to stream out your content, Friend Feed is a great place to post your feed. http://friendfeed.com//
For example, this is my FriendFeed page: http://friendfeed.com/craftybegonia
One thing that some bloggers complain about Blogger Blogs is the lack of trackbacks. For example, I am a member of several crafting communities and sometimes when I post a pattern or a tip, I am asked for a trackback. I cannot give one thorugh Blogger, because it does not offer that service.
If you have had that experience yourself and wished you could give a trackback, you can use the following service: http://haloscan.com/
This way, you will have FREE commenting, FREE Ratings and FREE Trackback.
Haloscan will provide you with a nice seamless way to integrate free trackback in your blog by means of a small code. If you want to, you can also add their comments component, replacing the the Blogger comments.
On the other hand, if you are afraid of having to put up with spammers, you can use this service. It is FREE for personal use: http://akismet.com/ It will filter spamming.
Photobucket, image and video hosting: http://photobucket.com/
Flickr, a popular image hosting site: http://flickr.com//
Are you running out of the space allowed for free accounts in places like Photobucket or Flickr? Why not try ImageShack? It is a free image hosting site that can help you if you need an alternative place to post images for your blog. Here's the URL, just in case you want to try them:
http://imageshack.us/
Do you want to run a poll, here's a place where you can go: http://www.freeblogpoll.com/
One essential new step is that you claim your blog at Technorati.
http://technorati.com/
Use MyBlogLog as a metrics tool:
http://www.mybloglog.com/
MyBlogLog tracks outgoing traffic to allow you to pinpoint where your traffic is going.
You can get traffic statistics from this site: http://www.statcounter.com/
Pingomatic is an automatic pinging tool for you to let search engines that take pings know that you have have posted a new topic in your blog. http://pingomatic.com/
Slide, photo hosting and slideshows: http://www.slide.com/main
If you want to add interesting news topics to your blog, try this site: http://www.topix.com/
Of course, you can use YouTube to post videos that bring traffic to your blog, to show tutorials, how to make some patterns, etc. It can be your free classroom! http://www.youtube.com/
Personally, I've used to it to introduce things, and it has been a good help.
Do you like to add fun photo effects to your blog?
Bubome might be the one that fits your bill! http://www.bubome.com/index.html
BeFunky is a free online cartoonizer that willmake your photos look like cartoons and then you can take them somewhere else to make slide shows out of them: http://www.befunky.com/
It offers other special effects aside from the cartoonizer which you might want to try also.
RockYou, add glitz to your pics, make fun slideshows, and more! http://www.rockyou.com/
Fotline, fun special effects for your pictures: http://www.fotline.ws/
Dumpr is a site that lets you add digital special effects to your photos for free, such as turning them into jigzaw puzzles, into drawing sketchets, etc. Here's the link: http://www.dumpr.net/
FREE Button Maker For Your Blog: http://tools.bloggerbuster.com/buttons/
FREE Favicon Maker: http://tools.bloggerbuster.com/favicon/
If you don't know what a favicon is, it is a tiny image which shows in your browser window when you visit different sites. It is just a fun item.
FREE Blogger Templates: http://freetemplates.blogspot.com/
Web Analysis Tool: http://www.seocompany.ca/tool/web-site-statistics/
FREE SEO Tools: http://www.seocompany.ca/tool/free-seo-tools.html
Website Keyword Analysis: http://www.seocompany.ca/tool/keyword-ranking/
Link Popularity: http://www.seocompany.ca/tool/link-popularity.php
Indexed Pages: http://www.seocompany.ca/tool/indexed-pages.php
Now, to a category closer to our hearts: Crafts!
There are some communities you should join to encouragement, networking, sharing, learning and also for fun, ehre are some of them:
http://www.mycraft.com/
http://crafterscommunity.com/
http://crochetme.com/
MyHandmadeRegistry is a brand new social communty for crafters which rewards you if you promote it: http://www.myhandmaderegistry.com/profile/ClotildeM
http://www.crochetville.org/forum/
http://www.getcrafty.com/
https://www.ravelry.com/account/login
I hope these tips will help you in some way to make your blogging better and more effective and your presence online stand out a little bit more. If you find this blog useful, Follow It! That way you will not miss a thing. Next week, back to regular crafting!
I leave you with a bit of Inspiration:
"Once I thought to find on earth
Love, perfect and complete.
Now, I know it carries wounds
In its hands and feet."
--Anna Hemstead Branch
If you want to get to know Him better, there's no other book like Steps to Christ. A sweet, short, beauttiful book. Read it online for FREE, here: http://www.stepstochrist.us/
Flowerumi Pincushion or REALLY Cute Wallet!
Materials: Worsted weight yarn scraps in colors of choice.
I used a small ball of yellow and two shades of brown scraps.
2 small buttons in a matching color
Tapestry needle
Crochet hook size H
I used a small ball of yellow and two shades of brown scraps.
2 small buttons in a matching color
Tapestry needle
Crochet hook size H
Front-
With nose color (I used medium brown):
Round 1- Ch 2, 8 sc in 2nd ch from hk, sl st to join rnd. Fasten off. Weave in tail. (8 sc)
Round 2- Join body color (I used a happy, bright yellow): Ch 2, 1 hdc in same spot as ch 2, 2 hdc in each sc all around. (16 hdc made.)
Round 3- Continuing with body color, ch 2, 1 hdc in same space as ch 2, *1 hdc in next st, 2hdc in next st, rep from * around, ending with 2 hdc. (23 sts made. )
Round 4- Ch 2, 3 hdc in same spot as ch 2, 1 hdc in each of next 5 sts, 4 hdc next st, (corner made), 1 hdc in each of next 5 sts, 4 hdc in next hdc, 1 hdc in each of next 5 hdc, 4 hdc in next hdc, 1 hdc in each of last 4 hdc, join with sl st. (35 hdc)
Round 5- Sl st till center of first corner. Ch 2, 2 hdc in corner, 1 hdc in next 3 hdc, 2 hdc in next st, [1 hdc in each of next 4 hdc, 3 hdc in corner,] rep 3 more times, 1 extra hdc in last st. Join rnd with sl st. (47 hdc)
Round 6- Sl st till you reach center of first corner. Ch 2, 2 hdc in same spot as ch 2, 1 hdc in each of next 12 hdc, *3 hdc in next hdc, 1 hdc in each of next 11 hdc, rep from * twice, 3 hdc in next corner, 1 hdc in each of next 2 hdc, 2 hdc in next hdc, 1 hdc in each of next 2 sts, 2 hdc in next st, 1 hdc in each of last 2 hdc. Sl st to join rnd. Fasten off.
Back- Rep rnds 1 to 6 but using only Bright Yellow.
Edging-
Row 1- With both Back and Front with Right Sides Facing outward, and using the same brown yarn you made the nose with, sc all around through both thicknesses, leaving top open to stuff it through. Ch 1, turn.
Row 2- 1 sc in each sc all the way to where you ended your Brown edging (it is not a real round because it only covers the bottom and sides.)
Ears-
With the same brown or color used for nose, Ch 2.
Rnd 1- 5 sc in 2nd ch from hook, sl st to join. (5 sc) Rnd 2- Ch 1, 1 sc in same space, 2 sc in each sc around. (10 sc)
Rnd 3- Ch 1, *1 sc in first sc, 2 sc in next sc, rep around from * to end, join with sl st. (15 sc)
Rnd 4- Ch 1, 1 sc all around. (15 sc) Fasten off. Leave a long tail to sew it with.
Eye patches- With lighter shade of brown, Ch 2, 5 sc in 2nd ch from hook. Add darker shade of brown and ch 1, make 11 sc around lighter brown circle. Fasten off leaving tail to sew it with.
Sew eye patches to Front above nose. If you want to, sew 1 button on top of each patch as an accent to the eyes . Gently stuff your pincushion. Sew top with original yellow yarn or sc across the top with the F hook. Sew ears to side corners. Sew a blossom or flower of your choice (use any pattern you like) to the top of the head.
Done!
Variation:
You can turn this flowerumi into a cute little wallet as follows: Make front patch, cut a piece of felt of a discreet color, like beige, a little bit smaller than the patch and sew it to the back. Repeat the same procedure with the back side. Of course, felt pieces must face inward. Follow the rest of the pattern until you come to the end. With the body color, make a small flap that will face the back of the little animal head, sew your blossom to the top of that flap, and make sure the ears are placed so that they lie on the sides of the head, and do not hinder the movement of the flap.
(the flap has to be somewhat narrower than the head). Cut a piece of felt and line that flap. Sew a piece of velcro to that felt lining. and another piece of velcro to where the flap will lie to close the little wallet. Clever and cute!
You could also increase the size and turn it into a cute purse for a little girl. The handle could be yellow and be sewn from side to side from the top of each ear.
You've got yourself one cute little purse!
Revised May 2011.
This pattern belongs to Craftybegonia. DO NOT sell it or post it as if it belonged to you.
I give free use of it so long as this site is properly credited and ownership is respected.
Do you need encouragement today? Let me suggest a small little gem of a book, it is the second most translated book in the world and one of the most beloved books by Christians around the globe. Printed in more than seventy languages, and bringing encouragement and ispiration to men and women for generations!
Read it for free online:
Another site where you will find important answers to soul questions: http://www.bibleuniverse.com/home.aspx