Spiky Little Neck Warmer

Best Blog Tips


This is another convertible piece for your cool Season wear. This contemporary neckwarmer is textured and nice and it works up really fast! It is really fun and I decided to show it in all the ways that you can wear it. It converts from a neck warmer into a neckie and back. Make it in your favorite color and let me know how you liked it.


Materials:
Worsted weight blue yarn
Crochet hook size H
4 shirt-size buttons mathing yarn (which would go easily thorugh dc sts)
blunt needle
scissors
Ch 49 with Blue and H hook.
Row 1- 1 dc in 4th chain from hook and in each ch across. (47 dc).
Row 2- 1 dc in each of next 3 dc, 1 hdc in next dc, 1 tr in next dc, 1 sc in next dc, *1 tr in next dc, 1 sc in next dc, rep from * across, stopping this stitch 6 sts from end of row. Now, proceed as follows: 1 hdc, 1 dc in next dc and in each dc to end of row. Ch 3, turn. Row 3-1 dc in each st across. Row 4- Rep row 2. Row 5- Rep row 3.


Continue alternating these two rows until you have completed 9 rows, ending with a dc row. Fasten off, weave in tails.
Make a shell trim for buttonholes as follows: Join yarn to the narrow edge of the neck warmer, ch 3, make 2 dc in same spot as ch 3, skip a little space, make 1 sc, skip a little space, make shell of 4 dc in next space, *skip a little space across and make 1 sc, skip a little bit, eyeballing it and make a shell of 4 dc, rep from * across. Fasten off and weave in tail. Sew 4 buttons on the opposite narrow edge of the neck warmer which will use these shells as buttonholes (you could do 5 if you wanted, because you are going to wind up with 5 shells, but I left the middle one without a button and it wourld out really well, choose a size of button that pushes easily in between dc stitches but stays secure and doesn't open up afterwards.)
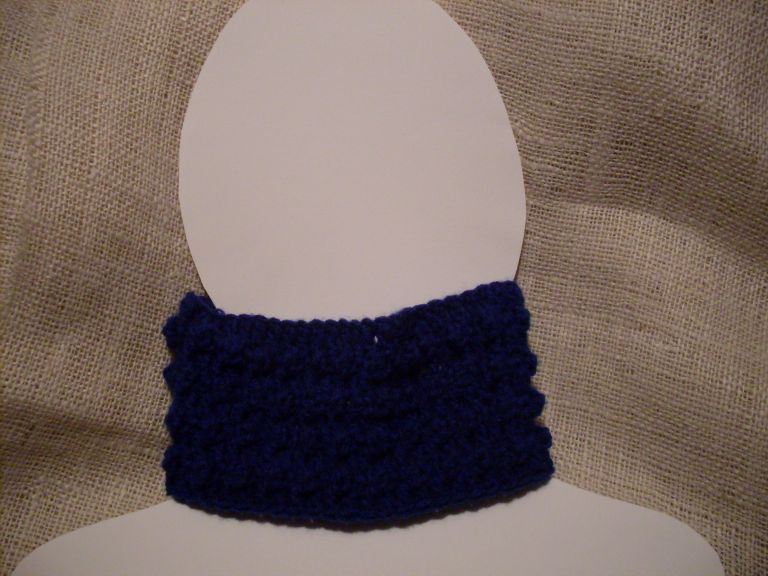
That's it!

Can A Saved Man Choose To Be Lost?


....................
Thank you Toqua's Crafts for Posting Spiky Little Neck Warmer on your site! I went and took a peek and it looks very pretty on you!
Toqua's Crafts


Best Blog Tips

Sea Foam Sonnet Lacy Block

Best Blog Tips


If you like to make shawls, this block will make a really fast one! It can also be used for a lot of different projects. If you want something dainty and airy and yet fast and easy to make, use this block for it!


7 1/2" x 7 1/2" lace square
With worsted weight yarn of your choice (I used Sea Foam)and crochet size H hook, ch 10. Sl st to join ring.Rnd 1- Ch 8, wrap yarn 4 times around hook, push the working yarn behind the hook and insert the hook in the ring, yo, and begin to create a treble, yo and pull through the loops until you have completed all loops, Ch 3. Repeat 11 times (12 DTrs, counting the starting chain). Rnd 2- Ch 4, wrap yarn in hook 3 times, insert in first ring of ch-3 space, yo, pull though loop, yo, pull through loop,yo, but leave last loop on hook, repeat with next 2 chs of ch-3 space and repeat in top of next DTr post, yo and pull though all loops on hook, ch 5 (petal cluster made). Repeat twice more.Ch 8 (corner), repeat 3 more cluster petals, ch 8 (another corner), repeat 3 more cluster petals, ch 8, (another corner made), repeat twice more. In the last cluster petal, insert the hook for hte last treble inat the base of beginning chain, complete your cluster petal, ch 8, slip st at beginning chain to end round. Rnd 3- Ch 3, 1 dc in top of of next petal cluster, ch 3, skip 2 ch and make 1 dc in next chain (the chain right before hte next petal cluster), *1 dc in top of petal cluster, ch 3, skip next 2 chains and make 1 dc in nextchain and 1 dc in top of next cluster petal, ch 3, skip 3 chain of corner ch-8, make 2 dc in next chain, ch 3, 2 dc in next chain, ch 3, skip until you reach the chain that is just before the next petal cluster, make1 dc in that chain and 1 dc in top of petal cluster, ch 3, rep from * all around until end of rnd.Rnd 4- Ch 3, 1 dc in next dc, 3 dc in ch-3 space, 1 dc in each of next 2 dc, *3 dc in ch-3 space, 1 dc in each of next 2 dc, 3 dc in ch-3 space, 1 dc in each of first 2 dc of corner shell, 2 dc, ch 3, 3 dc in center of cornershell, 1 dc in each of last 2 dc of corner shell, 3 dc in next ch-3 space, 2 dc in next 2 dc, 3 dc in next ch-3 space, 1 dc in eac of next 2 dc, rep from * around.
Best Blog Tips

Lacy Chevron Scarflette - Revised

Best Blog Tips


Something fun for Spring, this pretty and unusual scarflette is easier to make than it seems. The combination of high and lower stitches makes this one a light, almost airy scarflette and the feminine chevron ends add interest to the whole.
Materials-
Red Heart worsted weight Lavender
Crochet hook size H
Note- Every ch 4 counts as 1 Tr, every ch 3 counts as 1 dc and every ch 1 counts as 1 sc throughout.
Ch 63.
Row 1- 1 Tr in 4th ch from hook and in each ch across. Ch 3, turn.
Row 2- 1 dc in next Tr and in each Tr across. Ch 4, turn.
Row 3- 1 Tr in next dc and in each dc across. Ch 3, turn.
Continue repeating these two rows until you have completed 5 rows, ending with a Tr row.
Keyhole- When you finish the last Tr row, ch 1. Turn the corner and begin crocheting across by inserting the hook into the now horizontal stitches. Row 1- sc across. (16 sts made counting ch 1 as 1 sc). Ch 3, turn. Row 2- 1 dc in each of next 2 sc. Ch 10and skip across and make 1 dc in each of last 3 sc. Ch 1, turn. Row 3-1 sc in each of next 2 dc, 1 sc in each of next 10 ch, 1 sc in each of last 3 dc. (Keyhole made).
Ch 3, turn.
Chevron Lace:
Join yarn to other edge of scarflette.
Row 1- Working across the stitches now lying horizontally, make 16 sc. Ch 3, turn.
Row 2- 1 dc in each of next 15 sc. Ch 3, turn.
Row 3- Rep row 2. Ch 3, turn.
Row 4- 1 dc in each of next 6 dc, 2 dc in next dc, ch 1, 2 dc in next dc, 1 dc in each dc to end of row. Ch 6, turn.
Row 5- Skip 2 dc and make 1 dc in next dc, ch 3, skip 2 dc, 1 dc in next dc, 1 dc in each of next 3 dc, 2 dc, ch 1, 2 dc in middle ch-1 space, 1 dc in each of next 3 dc, ch 3, skip 2 dc, 1 dc in next dc, ch 3, skip all dc 1 dc in top of turning chain. Ch 3, turn.
Row 6- 3 dc in ch-3 space, 1 dc in next dc, ch 3, 1 dc in each of next 5 dc, 2 dc, ch 1, 2 dc in ch-1 space, 1 dc in each of next 5 dc, ch 3, 1 dc in next dc, 3 dc in ch-3 space, 1 dc in top of turning chain. Ch 6, turn.

Row 7- Skip 2 dc, 1 dc in next dc, ch 3, skip 2 dc, 3 dc in next ch sp, 1 dc in each of next 7 dc, 2 dc, ch 1, 2 dc in middle ch sp, 1 dc in each of next 7 dc, 3 dc in next ch sp, ch 3, skip 2 dc, 1 dc in next dc, ch 3, skip every dc until turning ch, 1 dc in top of turning chain. Ch 3, turn.
Row 8- 3 dc in ch-3 space, 1 dc in next dc, ch 3, [1 dc in next dc, 2 dc in next dc, 1 dc in next dc,] rep  4 times, 1 dc in each of next 3 dc, 2 dc, ch 1, 2 dc in middle ch sp, 1 dc in each of next 3 dc, [2 dc in next dc, 1 dc in next dc,] rep 4 times, 1 dc in next dc, ch 3, 1 dc in next dc, 3 dc in ch-3 space, 1 dc in turning chain. Ch 3, turn. Row 9- 1 dc in each of next 3 dc, ch 3, 1 dc in each dc till you reach the middle ch sp, 2 dc, ch 1, 2 dc in ch-1 space, 1 dc in each dc till you reach next ch sp, ch 3, 1 dc in each dc till end of row. Fasten off, weave in tail.
Repeat Chevron Lace pattern on opposite end of scarflette. Fasten off, weave in tails.
Done!

Precious Bible Promises to Empower You!
Best Blog Tips

Beautiful Medallion Motif

Best Blog Tips


Whether you use them to make shawls, afghans, table runners, or even a lacy scarf, medallion motifs are a great addition to your crochet toolbox of stitches! I would like to share one that I just came up with today. I made it in worsted yarn but depending on what you want to use it for (it has a good size 6" x 6"), you can make it in worsted weight cotton (great for coasters), or even in size 10 cotton thread (you must use a size C crochet hook and the size of the motif will be reduced) this is a very versatile motif, it is very easy to make and it is very pretty.


Here's what you will need to make it:
Materials:
Red Heart worsted weight yarn Carrot
Size H crochet hook

With Carrot and H hook, ch 6, slip stitch to close rnd.Rnd 1- Ch 3, make 17 dc in ring. Sl st to close ring.Rnd 2- Ch 3, 1 dc in each of next 4 dc, ch 2, sl st in next dc, *ch 3, 1 dc in each of next 4 dc, ch 2, sl st in next dc, rep around. In last stitches proceed as follows, ch 2, sl st in next dc, ch 3,2 dc in next dc, 2 dc in next dc, ch 2, sl st in same space as beginning ch 3.Rnd 3- Slip stitch up the beginning ch-3 untilyou get in top of the beginning chain. Chain 3 there, and 1 dc in same space, 2 dc in next dc, ch 5, 2 dc in next dc, 2 dc in next dc, ch 2, *2 dc in next dc, 2dc in next dc, ch 4, 2 dc in next dc, 2 dc in next dc, ch 2 (skipping ch 3 space and sc of previous row), rep from * around. Sl st in beginning chain to close round. Rnd 4- Ch 3, 1 dc in each of next 2 dc, skip last dc of that 4-dc cluster, ch 2, 1 sc in top of ch-5 chain, ch 2m skip 1st dc of next 4-dc cluster, 1 dc in each of next 3 dc, ch 2, 1 sc in nextch-2 space, ch 2, 1 dc in each of next 3 dc, skip last dc of 4 dc-cluster, ch 2, 1 sc in top of ch-5 loop, ch 2, 1 dc in each of next 3 dc, skip last dc of 4-dc cluster, ch 2, 1 sc in 2-sc space, ch 1, 1 dc in each of next 3 dc, skip last dc of 4-dc cluster, ch 2, 1 sc in top of 5-ch loop, ch 1, 1 dc in each of next 3 dc, skip last dc of 4-dc cluster, ch 2, 1 sc in ch-2 space, ch 2, 1 dc in each of next 3 dc, skip last dc of 4-dc cluster, ch 2, 1 sc in top of ch-5 loop, ch 1, rep around, end round with slip st in top of beginning chain 3.


Encouragement for the Cloudy Days in Your Life:
Are You Having a Bad Day?


Best Blog Tips

First Rose of Spring

Best Blog Tips


I love roses, including the simple "sweet briars", I decided to use a rose as the closure for this pretty short scarf. This scarf is very feminine and very easy to make. You can make it in any color you choose. I picked these because they make the red rose stand out most vividly.

Materials-
Red Heart worsted weight Soft Navy
Red Heart worsted weight Cherry Red
Red Heart worsted weight Kelly Green
Crochet size H hook
Scissors
Blunt needle

Note- Ch 3 equals 1 dc throughout scarflette's pattern.

Scarflette-
With Soft Navy and H hk, ch 116. Row 1- 1 dc in 6th ch from hook, *chain 1, skip 1 chain, 1 dc in next chain, rep from * across chain. Ch 3, turn. Row 2- 1 dc in next dc and in each ch-1 space in each dc across row. Ch 3, turn. Row 3- 1 dc in next dc, *Insert hook in next dc, draw up loop, yo, draw up loop in that same dc a total of 4 times, yo, and pull loop through all loops on hook, ch 1 to secure it (popcorn made), 1 dc in each of next 2 dc, ch 1, skip 1 dc, rep from * across row. Ch 3, turn. Row 4- 1 dc in each dc and ch-1 space across row. Ch 4, turn. Row 5- Skip next dc, 1 dc in next dc, *ch 1, skip 1 dc, 1 dc in next dc, rep from * across. Ch 3, turn. Rep rows 2 to 5 once more.

Edging- As you finish row 5, ch 1, and turn the corner. Make 1 sc in each stitch across the narrow edge fo the scarflette, to give it a neater edge. Fasten off.

Join Soft Navy on opposite edge and repeat this straight neater edge. Fasten off. Weave in tails.
Briar Rose Closure-
Rose- With H hook and Cherry Red, ch 4. Rnd 1- Make 11 dc in 4th ch from hook (12 sts made). Sl st in top of beginning chain to join it. Rnd 2- Chain 3, skip 1 dc and slip st in next dc, repeat around until you have six ch-3 loops. At the last chain-3, skip 3 dc instead of 1 and slip st in top of beginning chain. Ch 1.
Rnd 3- In first ch-3 loop, make 1 sc, 1 hdc, 1 dc, 1 Tr, 1 dc, 1 hdc, 1 sc. *In next ch-3 loop, make 1 sc, 1 hdc, 1 dc, 1 Tr, 1 dc, 1 hdc,1 sc, repeat from * in every ch-3 loop around.
Rnd 4- Don't slip stitch to join the previous round! Take a moment to notice the stitches that were skipped in between the loops. (You can see them clearly, they are the stitches in the center you started with and that were not used when you made the loops), slip stitch in the first one, closes to the spot where you finished your last petal.
Then make a chain 5, skip a dc, slip stitch into the next previously skipped dc, and ch 5 again, repeat this procedure until you reach the spot hwere you started, sl st in that very stitch. You will now have 6 loops around the flower center. Ch 1. Rnd 5- In first loop, make 1 sc, 1 hdc, 4 dc, 1 hdc, 1 sc, * in next ch-5 loop, make 1 sc, 1 hdc, 4 dc, 1 hdc, 1 sc, repeat from * in each loop around.
Do not slip stitch to join round. Take a look at the center of the rose again, you will see that there are some loops that are "free" to use because of the skipping that you did before. We will use those next. Rnd 6- Ch 6, slip stitch in next "free" stitch around the center of the rose, skip 1 stitch, ch 6, sl st in next st, repeat around until you reach your beginning stitch, sl st there. Ch 1.
Rnd 7- In first ch-6 loop, make 1 sc, 6 hdc, 1 sc, *in next ch-6 loop make 1 sc, 6 hdc, 1 sc, repeat from * around. You are done with the rose. Fasten off, Cherry Red, weave in tail at the back. Join Kelly Green. The closure loop is green, we will pretend it is made out of "foliage".


Closure Loop- In any Tr of any petal of the first circle of petals made (the ones that end up at the bottom), ch 2, 1 sc in next 2 sts, ch 1, skip into 1st dc of next petal, 1 sc in that dc, 1 sc in each of next 2 sts. Ch 1, turn. Note- Ch 1 counts as 1 sc and ch 3 counts as 1 dc in the Closure Loop.


Row 2- 1 sc in each st across (7 sc). Ch 3, turn. Row 3- 1 dc in next sc and in each sc across (7 dc). Ch 1, turn. Row 4- 1 sc in next dc and in each dc across. Row 5- Rep row 4. Row 6- Rep row 3.


Continue repeating these rows (2 rows of sc and hten 1 row of dc) until you have completed 21 rows from the start, ending with 2 rows of sc. Fasten off, leaving a long tail to sew with. Using long tail and blunt needle sew the end of the green strip to the 2 rose petals directly opposite the ones you stred with (at the same level.)


Put the scarflette around your neck. Find a comfortable spot to place the closure. Slip the Rose Loop up to that spot and pin it to the scaflette. Take off the scarflette. Join Kelly green to the back of the Loop, wich now lies over the back of the scarflette, and sew the back of the Loop to the back of the scarflette so that the Loop will remain in place. (Leave the front part where the rose is free!) Fasten off.


Now you can comfortably insert the other side of the scarflette through this lovely loop to close it around your neck.


Online Bible Courses, No Obligation

"Life is short, and we have never too much time for gladdening the hearts of those
who are traveling the dark journey with us. O, be swift to love, make haste to be kind."

Join My Fan Page on Facebook!

Craftybegonia Arts and Crafts Fan Page
Best Blog Tips

That Cute Little Red Ascott

Best Blog Tips


This is the kind of little scarf that every crocheter should have in hand when thinking about gift-making.
It is also great for charity. It works up really fast. I made it in two sittings.
So, this one will work if you want to make a whole bunch of scarflettes.
Note 1- If you would like it to be a bit more loose around your neck, simply add 11 or 16 more stitches to the
foundation chain and follow the pattern as written originally. That will make the scarflet a bit loser. You can also make it the same length but
reduce the size of the keyhole by 5 stitches, which will increase the give as the scarf is tied around the neck.
The idea of this one was to immitate a hankerchief around the neck, so it was not designed to be like a long
scarf that you can wind up several times around the neck. A young girl will love one of this one!
Make it in her favorite color or in blue jean hues!
Note 2- Ch 1 turning chain stands for 1 sc throughout.

Skill- Moderately easy
Size- Approximately 5" W x 21 1/2' L

Materials:
Red Heart worsted weight Cherry Red yarn
Crochet hook size H
Scissors
blunt needle (to weave in yarn tails)

With H hook and Cherry Red ch 81. Row 1- 1 sc in 3rd ch from hook and in each ch across. Ch 2, turn.
Row 2- Skip 1st sc, 1 sc in next sc, *ch 1, skip next sc, 1 sc in next sc, rep from * across. Ch 1, turn.
Row 3- 1 sc in ch-1 space, ch 1, skip next sc, *1 sc in ch-1 space, ch 1, skip next sc, 1 sc in next ch-1 space, ch 1, skip next sc, rep from * across. Note 3- Don't work too tight so that the stitch won't "pull" and become distorted.
Rows 4 to 6- Rep rows 2 and 3 alternately. Ch 1, turn. Row 7- 1 sc in each sc and in each ch-1 space across.Ch 1, turn.
Row 8- (As before, ch 1 counts as first sc of row). 1 sc in each of next 13 sc. Keyhole: ch 12, skip 12 sc, 1 sc in next sc, 1 sc in each sc across. Ch 2, turn. Row 9- Skip next sc, 1 sc in next sc, ch 1, *skip next sc, 1 sc in next sc, ch 1, rep from * until you reach the opening (keyhole), then, make 1 sc in each chain of the opening, 1 sc in next sc (first sc on the other side of the keyhole), *ch 1, skip next sc, 1 sc in next sc, rep from * across.
Rows 10 to 14- Repeat rows 2 and 3
alternately. Ch 1, turn. Row 15- Make 1 sc in each sc and ch-1 space across row.
Edges- As you reach the end of row 15, ch 1 (do not fasten off), turn the corner and sc across the narrow edge of the little scarf.
Fasten off, weave in tail. Join yarn to the opposite end and sc across the narrow edge. Fasten off, weave in tail.
Finished!


Online Bible Courses, No Obligation
Best Blog Tips

Woodsy Cozy

Best Blog Tips


This one is super-easy but it looks really good!
Materials:

Red Heart worsted weight Woodsy
Red Heart worsted weiight Coffee (scraps)
Crochet hook size H

Note: Ch 3 counts as 1 dc throughout.

Ch 93.
Row 1- 1 dc in 4th ch from hk and in each ch across. (91 dc). Ch 3, turn. Row 2- 1 dc in each of next 5 dc, ch 1, skip 1 dc, 1 dc in next dc, ch 1, skip 1 dc, 1 dc in next dc, ch 1, skip 1 dc, 1 dc in next dc, ch 1, skip next dc,*1 dc in each of next 6 dc, ch 1, ch 1, skip 1 dc, 1 dc in next dc, ch 1, skip 1 dc, 1 dc in next dc, ch 1, skip 1 dc, 1 dc in next dc, ch 1, skip next dc, rep from * till end of row. Finish row as follows: ch 1, skip 1 dc, 1 dc in next dc, ch 1, skip 1 dc, 1 dc in next dc, ch 1, 1 dc in each of last 2 dc. Ch 3, turn.
Row 3- 1 dc in next dc, ch 1, skip 1 dc, 1 dc in next dc, ch 1, skip 1 dc, 1 dc in next dc ch 1, *1 dc in each of next 6 dc, ch 1, ch 1, skip 1 dc, 1 dc in next dc, ch 1, skip 1 dc, 1 dc in next dc, ch 1, skip 1 dc, 1 dc in next dc, ch 1, skip next dc, rep from * till end of row. Ch 4, turn. Row 4- Skip next dc, 1 dc in next dc, ch 1, skip 1 dc, 1 dc in next dc, ch 1, skip 1 dc, *1 dc in each of next 6 stitches (ch 1 spaces and dc included), ch 1, skip ch 1 space, 1 dc in next dc, ch 1, skip 1 dc, 1 dc in next dc, ch 1, skip 1 dc, 1 dc in next dc, ch 1, skip 1 dc, rep from * across to end of row. Finish row by making 1 dc in each of last 7 sts (dcs and ch 1s included). Ch 3, turn.
Row 5- Rep row 4. Ch 3, turn. Row 6- 1 dc in each of next 5 dc, ch 1, skip 1 dc, 1 dc in next dc, ch 1, skip 1 dc, 1 dc in next dc, ch 1, skip 1 dc, 1 dc in next dc, ch 1, skip next ch-1 space, 1 dc in each of next 6 stitches (dcs and ch-1 spaces included), *ch 1, skip 1 dc, 1 dc in next dc, ch 1, skip 1 dc, 1 dc in next dc, ch 1, skip 1 dc, 1 dc in next dc, ch 1, skip next ch-1 space, 1 dc in each of next 6 stitches (dcs and ch-1 spaces included). Rep from * to end of row. End row by making 1 dc in each of last 2 sts.
Row 6- Rep row 5. Ch 3, turn. Row 7- Make 1 dc in each dc and in ch-1 space across. Fasten off. Weave in tials.
Edges- Make a row of sc stitches on both narrow edges of the scarflette to give it a cleaner look. Fastenoff. Weave in tials.
Closure- With Coffee, Ch 20. Slip stitch to form a circle. Ch 3, do not turn. Make 42 dc in circle. slip stitch to close, leaving a long tail to sew with. Lay the cozy in a hard surface to be able to measure it well. Count from edge upwards 18 stitches. Insert the brown circle you just made into the cozy to the level of that 18th stitch, with the side that has the long tail to the back. Sew it in place across the back of that row, leaving free the portion of the circle that faces the right side of the cozy. To close cozy around the neck, simply insert the other side into that open half-circle.
You're done!


"Once I thought to find on earth
Love, perfect and complete.
Now I know it carries wounds
In its hands and feet."
—Anna Hempstead Branch
The Desire of Ages. Considered the most beautiful biography of Christ ever writen.
Listen to it for FREE online!
Best Blog Tips