Showing posts with label neck warmer. Show all posts

Lacy Necktie Too

Best Blog Tips


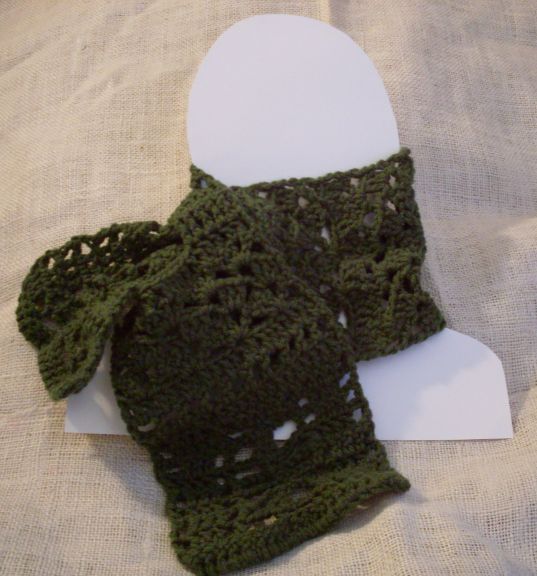
While revising and remaking the Lacy Necktie pattern of a year ago that has been so popular, I decided to remake the Lacy Necktie a second time, in another color and with a different edging, just to give you guys a new option for this lovely pattern, and here it is. For a girl who works and who likes a neutral palette for her wardrobe or for any woman who likes neutral or earthy colors that go with just about anything, this is a great and still very feminine choice. Hope you like it!

Materials- Worsted weight yarn (color of your choice. I used Red Heart Coffee.)
Size H crochet hook
Blunt needle to weave in ends and sew necktie strap
Scissors

Ch 22.
Row 1: Dc in 4th ch from hk and in each ch across. Ch 1, turn. (20 dc)
Row 2: 1 sc in each of first 5 dc, ch 5, skip 3 dc, 1 sc in each of next 5 dc, ch 5, skip 3 dc, 1 sc in each of last 4 sc. Ch 3, turn.
Row 3: 1 dc in each of next 2 sc, skip 2 sc, make 7 dc in ch-5 loop, skip 2 sc, 2 dc in next sc, skip 2 sc, 7 dc in next ch-5 loop, skip 2 sc, 1 dc in each of next 2 sc, 1 dc in last sc of row. Ch 3, turn.
Row 4: 1 dc in next 2 dc, ch 3, skip first 3 dc of 7-dc shell, 1 sc in next dc of shell (4th dc of shell), ch 3, skip last 3 dc of shell, 1 dc in each of next 2 dc, ch 3, skip first 3 dc of next 7-dc shell, ch 3, 1 sc in 4th dc of shell, ch 3, skip last 3 dc of shell, 1 dc in each of last 3 sts of row. Ch 3, turn.
Row 5: 1 dc in each stitch across. (22 dc) Ch 1, turn.
Row 6- 1 sc in each of first 5 dc, ch 5, skip 3 dc, 1 sc in each of next 5 dc, ch 5, skip 3 dc, 1 sc in each of last 6 sc. Ch 3, turn.
Row 7- 1 dc in each of next 2 sc, skip 3 sc, make 7 dc in ch-5 loop, skip 2 sc, 2 dc in next sc, skip 2 sc, 7 dc in next ch-5 loop, skip 2 sc, 1 dc in each of next 2 sc, 1 dc in last sc of row. Ch 3, turn.
Row 8- Row 4: 1 dc in next 2 dc, ch 3, skip first 3 dc of 7-dc shell, 1 sc in next dc of shell (4th dc of shell), ch 3, skip last 3 dc of shell, 1 dc in each of next 2 dc, ch 3, skip first 3 dc of next 7-dc shell, ch 3, 1 sc in 4th dc of shell, ch 3, skip last 3 dc of shell, 1 dc in each of last 3 sts of row. Ch 3, turn.
Row 9- 1 dc in each stitch and ch across. (22 dc)
Row 10- 1 sc in each of first 5 dc, ch 5, skip 3 dc, 1 sc in each of next 5 dc,ch 5, skip 3 dc, 1 sc in each of last 4 sc. Ch 3, turn.
Row 11- 1 dc in each of next 2 sc, skip 3 sc, make 7 dc in ch-5 loop, skip 2 sc, 2 dc in next sc, skip 2 sc, 7 dc in next ch-5 loop, skip 2 sc, 1 dc in each of next 2 sc, 1 dc in last sc of row. Ch 3, turn.
Row 12- 1 dc in next 2 dc, ch 3, skip first 3 dc of 7-dc shell, 1 sc in next dc of shell (4th dc of shell), ch 3, skip last 3 dc of shell, 1 dc in each of next 2 dc, ch 3, skip first 3 dc of next 7-dc shell, ch 3, 1 sc in 4th dc of shell, ch 3, skip last 3 dc of shell, 1 dc in each of last 3 sts of row. Ch 3, turn.
Row 13- 1 dc in each st and ch across. (22 dc)
Row 14- 1 sc in each of first 5 dc, ch 5, skip 3 dc, 1 sc in each of next 5 dc,ch 5, skip 3 dc, 1 sc in each of last 4 sc. Ch 3, turn.
Row 15- 1 dc in each of next 2 sc, skip 2 sc, make 7 dc in ch-5 loop, skip 2 sc, 2 dc in next 2 sc, skip 2 sc, 7 dc in next ch-5 loop, skip 3 sc, 1 dc in each sc to end of row. Ch 3, turn.
Row 16- 1 dc in next 2 dc, ch 3, skip first 3 dc of 7-dc shell, 1 sc in next dc of shell (4th dc of shell), ch 3, skip last 3 dc of shell, 1 dc in each of next 2 dc, ch 3, skip first 3 dc of next 7-dc shell, ch 3, 1 sc in 4th dc of shell, ch 3, skip last 3 dc of shell, 1 dc in each of last 3 sts of row. Ch 3, turn.
Rows 17 to 28- Continue repeating rows 2-5 for pattern, until your necktie measures 14 inches. Ch 3, turn.
Row 29- 1 dc in each of next 2 dc, dc2tog over next 2 ch, 1 dc in next sc, 1 dc in each of next 3 ch, 1 dc in each of next 2 dc, dc2tog over next 2 ch, 1 dc in each stitch and ch till end of row. (20 dc)
Row 30- Sc2tog (reduce sc) as follows: draw up a loop in each of next 2 dc, yo, draw up loop through all loops on hook. 1 sc in each of next 16 dc, sc2tog over next 2 sc, Ch 1, turn. (18 sc).
Row 31- Sc2tog over first 2 sc, 1 sc in each sc till last 2 sc, sc2tog voer last 2 sc. Ch 1, turn. (16 sc).
Row 32- Sc2tog over first 2 sc, 1 sc in each of next 2 sc, sc2tog over next 2 sc, 1 sc in each of next 3 sc, sc2tog over next 2 sc, 1 sc in next sc, sc2tog over last 2 sc. (10 sc). Ch 1, turn.
Row 33- 1 sc in each of first 4 sc, sc2tog over next 2 sc, 1 sc in each of sc to end of row. (9 sc). Ch 1, turn.
Row 34- 1 sc in each of first 3 sc, sc2tog over next 2 sc, 1 sc in next sc, sc2tog over next 2 sc, 1 sc in last sc. (7 sc). Ch 1, turn.
Row 35: 1 sc in each of first 2 sc, sc2tog over next 2 sc, 1 sc in each of last 2 sc (6 sc). Ch 1, turn.
Row 36: 1 sc in each sc.
Rows 37 to 54- 1 sc in each sc across. (6 sc) Fasten off, leaving a long tail to sew. Bend it inwards towards the wrong side, and, threading blunt needle with leftover tail, sew it to the row above the beginning row (row 36) to form a loop. Weave in end. Join yarn to the other end of the neck warmer.
Opposite side- row 1: Rep row 30 of opposite side.
Row 2: Rep row 31 of opposite side.
Row 3- Rep row 32 of opposite side.
Row 4- Rep row 33 of opposite side.
Row 5- Rep row 34 of opposite side.
Row 6- Rep row 35 of opposite side.
Rows 7 to 8- 1 sc in each sc across. Ch 1, turn. (6 sc)
Rows 9 to 10- 1 sc in each sc across. Ch 1, turn. (6 sc)
Rows 11 to 12- 1 sc in each sc across. Ch 1, turn. (6 sc)
Row 13 (Increase Row)- Make 2 sc in first sc of row, 1 sc in next sc, 2 sc in each of next 2 sc, 1 sc in next sc, 2 sc in last sc. Ch 1, turn. (10 sc)
Row 14- 2 sc in first sc, 1 sc in each sc across until you reach last sc, 2 sc in last sc. Ch 1, turn. (12 sc)
Row 15: 1 sc in each of first 2 sc, 2 sc in next sc, 1 sc in each of next 2 sc, 2 sc in next sc, 1 sc in each of next 2 sc, 2 sc in next sc, 1 sc in next sc, 2 sc in last sc of row. Ch 1, turn. (16 sc)
Row 16: 1 sc in each sc across. (16 sc) Ch 4, turn (counts as first dc plus ch 1 of next row).
Row 17 (Edging Fan)- Skip next sc, 1 dc in next sc, ch 1, skip next sc, 1 dc in next sc, ch 1, skip next 2 sc, 1 dc, ch 2, 1 dc in next sc, ch 1, skip next 2 sc, 1 dc in next sc, ch 1, skip next sc,
1 dc in next sc, ch 1, skip next sc, 1 dc in last sc. Ch 4, turn (counts as first dc plus ch 1 of next row).
Row 18- Skip to second ch-sp, 1 dc in that ch space, 1 dc in next dc, 3 dc in next ch sp, 1 dc in next dc, 3 dc in next ch sp, 1 dc in next ch sp, ch 1, 1 dc in last dc of row. Ch 4, turn (counts as first dc and ch 1 of next row.)
Row 19- Skip next ch-sp, 1 dc in next dc, ch 3, skip next 4 dc, [1 dc in next dc, ch 2,] rep 4 times, ch 3, skip next 3 dc, 1 dc in next dc, ch 1, 1 dc in last dc. Fasten off, weave in tail.
Join yarn to the end of the loop you made on opposite side of new warmer.
(Edging Fan)- Row 1: Working on the right side and inserting hook through both thicknesses of edg of loop formed,repeat edging for opposite side of necktie. Fasten off. Weave in tail. Clean up all yarn ends.
You're done!


.....................
Wonderful Love of God

Best Blog Tips

Earth Tones Scarflet

Best Blog Tips


Many of you have told me how much you like my keyhole scarflets. I want to thank you for your nice comments! This one is very simple and fast to make but it looks really pretty. And because of its earthy tones, it goes well with a whole lot of clothes!

Materials:
Red Heart worsted weight yarn Woodsy (variegated)
Red Heart (Classic) worsted weight yarn Sea Coral
Blunt needle
Scissors
Crochet hook size H
Note- Ch 3 counts as 1 dc throughout.

Lace Half Rounds (Make 2)- With Sea Coral, ch 5. Sl st to join rnd.
Row 1- Ch 3, 10 dc in ring (11 dc made.) Ch 5, turn. Row 2- Skip next dc, 1 sc in next dc, *ch 5, skip 1 dc, 1 sc in next dc, rep from * across. Row 3- Ch 3, 8 dc in 1st loop, 1 sc in next loop, 9 dc in next loop, 1 sc in next loop, 9 dc in last loop. Row 4- Picking up sts across the top of the motif by inserting the hook into the various dc sts, make 10 sc across. Fasten off Sea Coral and weave in tail. Join Woodsy.
Scarflet: (Side #1) Row 1- Count the dc in first loop at the top of motif (skip the first 6 dc in loop), work 1 sc in each of next 2 sc, 2 sc in next sc, 1 sc in each of next 2 sc, 2 sc in next sc, 1 sc in each of next 2 sc, 2 sc in next sc, 1 sc in each of next 2 sc. Ch 1, turn. (18 sc) Ch 3, turn.
Row 2- 1 dc in same spot as ch 3, 1 dc in each sc till last sc, 2 dc in last sc. Ch 3, turn. (20 sc) Ch 3, turn. Row 3- 1 dc in each of next 6 dc, 2 dc in next dc, 1 dc in each of next 5 dc, 2 dc in next dc, 1 dc in each dc till end of row (22 dc) Ch 3, turn. Row 4- 1 dc in each dc across row. (22 dc) Ch 3, turn. Row 5- 1 dc in each dc across. Ch 3, turn. (22 dc) Row 6- 1 dc in each of next 6 dc, 2 dc in next dc, 1 dc in each of next 6 dc, 2 dc in next dc, 1 dc in each dc to end of row. Ch 4, turn. (24 dc) Keyhole: Row 7- 1 tr in each of next 4 dc, ch 14, skip 14 dc, 1 tr in each of last 5 dc. Ch 3, turn. (keyhole made.) Row 8- 1 dc in each of next 4 tr, 1 dc in each of next 14 ch, 1 dc in each tr to end of row. (24 sts) Row 9- 1 tr in each dc across. (24 sts) Ch 3, turn. Row 10- 1 dc in each of next 4 tr, 2 dc in next tr, 1 dc in each of next 12 tr, 2 dc in next tr, 1 dc in each of last 5 tr. (26 dc) Ch 4, turn. Row 11- 1 tr in each dc across. (26 tr) Ch 3, turn. Row 12- 1 dc in each tr across. (26 dc ) Ch 4, turn. Row 13- 1 tr in each dc across. (26 tr) Ch 3, turn. Row 14- 1 dc in each tr across. (26 tr) Ch 4, turn. Row 15 to 20- Continue to alternate 1 tr and 1 dc row, ending with a dc row. Ch 2, turn. Row 21- 1 hdc in each dc across. Fasten off, weave in tail.
Side # 2- Repeat first 6 rows as for Side #1. Row 7- 1 tr in each dc across. Ch 3, turn. Row 8- 1 dc in each tr across. Ch 4, turn. Row 9- 1 tr in each dc across. Ch 3, turn. Rows 10 to 20- Rep rows 10 to 20 as per Side # 1, ending with a tr row. Row 21- 1 hdc in each tr across. Fasten off, leaving long tail to sew with. With both wrong sides facing, sew the two pieces together, being careful that the stitches are even and the result will be flat and not wrinkled. Fasten off.

Weave in tail.

Done!

————————————————————————————

Wonderful Book! Read FREE Online:

From STRESS to JOY
Best Blog Tips

Exquisite Ruby Warming Collar

Best Blog Tips


Do you love feminine stuff? Do you like ruffles? Well, this has something of both!

The color will cheer up a blah winter day and the warming collar will add enough warmth to keep you comfy while adding a pretty note to what you're wearing. Easy and fast as can be, this will make a great gift!
Materials:
Red Heart worsted weight Cherry Red
Red sewing thread
Sewing needle
Crochet hook size H
Red Button

With Cherry red, ch 56.
Row 1- 1 hdc in third ch from hook and in each ch across. Ch2, turn.
Row 2- 1hdc in same spot as ch 2, 1 hdc in each hdc across till end of row, 2 hdc in last hdc. Ch2, turn.
Row 3- 1 hdc in third ch from hook and in each ch across. Ch2, turn.
Row 4- Rep row 2.
Row 5- Rep row 3.
Row 6- Rep row 2.
Row 7- Rep row 3.
Lace- Row 1- Ch 4, skip 2 hdc, 6 dc in next hdc, ch 2, skip 2 hdc, 1 sc in next hdc, ch 2, skip 2 hdc, 6 dc in next hdc, rep across. Finish row as follows: ch 2, 1 dc in last hdc. Ch 5, turn.
Row 2- 1 dc in first dc of shell, ch 1, 1 dc in next dc of shell, ch 1, 2 dc in next dc of shell, ch 1, 2 dc in next dc of shell, ch 1, 1 dc in next dc of shell, ch 1, 1 dc in last dc of shell, ch 2, 1 sc in next sc, ch 1, rep across. Ch 3, turn. Row 3- 1 dc in first dc of shell, ch 1, [1 dc in next dc, ch 1] rep twice, skip next dc, 2 dc in next ch-1 space, ch 1, 1 dc in next dc, ch 1, 1 dc in next dc, ch 1, skip next dc, [1 dc in next dc, ch 1] rep twice, ch 2, 1 sc in next sc, rep across.
The large shells must now be forming a gentle, but lovely ruffled edge to the collar.
When you reach the end of the last row, sc up the side of the collar towards the top. Ch 4. skip 2 sc, slip stitch in next sc (button loop made), 1 sc in each ch of button loop (so tht the loop will better withstand wear.) Fasten off, weave in tail. Sew button in place to correspond with the loop made.

You’re done!


Bible Universe!
Best Blog Tips

Rose Serenade Scarflet

Best Blog Tips


This is a little scarflet you can make in one or two sittings. Not long and cumbersome but short and practical. Cute and yet warm enough to do the job.
It has somewhat of a retro look, which is a little nostalgic, hope you enjoy it!

Materials:
Worsted variegated yarn of your choice (I used Red Heart Classic Rambling Rose)
Crochet hook size H

Hexagon Edges (make 2)- Ch 7. Sl st to join rnd.
Rnd 1- Ch 1, make 12 sc in chain, sl st to join. Rnd 2- Ch 5, * 1 dc in next sc, ch 2, 1 dc in next sc, ch 2, rep from * around. Ch 2, slip st to join rnd. Rnd 3- Sl st till you reach first ch-2 space, ch 3, 3 dc in that ch-2 space, ch 2, 1 dc in next ch-2 space, ch 2, *4 dc in next ch-2 sp, ch 2, 1 dc in next ch-2 sp, ch 2, rep from * around. End rnd as follows: Ch 2, sl st to join rnd. Rnd 4- Sl st till you reach first ch-2 space, ch 3, 1 dc in that space, ch 3, skip next dc, 2 dc in next ch-2 sp, skip next dc, 1 dc in each of next 3 dc, 2 dc in next ch-2 sp, ch 3, skip next dc, 2 dc in next ch-2 sp, skip next dc, 1 dc in each of next 3 dc, 2 dc in next ch-2 sp, ch 3, skip next dc, 2 dc in next ch-2 space, skip next dc, 1 dc in each of next 3 dc, 2 dc in ch-2 sp, ch 3, skip next dc, 2 dc in next ch-2 space, skip next dc, 1 dc in each of next 3 dc, 2 dc in next ch-2 space, skip next dc, ch 3, 2 dc in next ch-2 space, skip next dc, 1 dc in each of next 3 dc, ch 3, 2 dc in next ch-2 sp,skip next dc, 2 dc in next ch-2 sp, skip next dc, 1 dc in each of next 3 dc, 2 dc in next ch-2 space, ch 3, skip next dc, 2 dc in next ch-2 space, skip next st, 1 dc in each of next 3 dc, sl st to join rnd.
Beginning of Scarflet:
Left Side-Make 3 sl st in ch-3 sp, ch 4, turn. Row 1- 1 dc in first ch-3sp, ch 1, skip 1 dc, 1 dc in next dc, *ch1, skip 1 dc, 1 dc in next dc, rep from * till you reach ch-3 sp, 1 dc, ch 1, 1 dc in thta ch-3 sp. Ch 4, turn.
Note 1- Beg ch 3 counts as 1 dc.
Note 2- Beg ch 4, counts as 1 tr.
Row 2- 1 tr in next ch-1 sp, 1 tr in next dc, *1 tr in next ch-1 sp, 1 tr in next dc, rep from * across. Ch 4, turn.
Row 3- Skip 1 tr, 1 dc in next tr, ch 1, * skip 1 tr, 1 dc in next tr, ch 1, rep from * across. Ch 4, turn. Row 4- 2 tr in next ch-1 sp, 1 tr in next dc, *2 tr in next ch-1 sp, 1 tr in next dc, rep from * across. Ch 4, turn. Row 5- Skip 1 tr, 1 dc in next tr, *ch 1, skip 1 tr, 1 dc in next tr, rep from * across. Ch 4, turn. Row 6- 1 tr in next ch-1 sp, 1 tr in next dc, 1 tr in next ch-1 sp, 1 tr in next dc, ch 9, skip each of next 9 stitches (counting both chains and dcs), 1 tr in next stitch, 1 tr in each stitch till end of row (keyhole made). Ch 3, turn.
Row 7-1 dc in each of next 4 tr, 1 dc in each of next 9 ch, 1 dc in each of last 5 sts. Ch 4, turn. Row 8- Skip 1 tr, 1 dc in next tr, *ch 1, skip 1 tr, 1 dc in next tr, rep from * across. Ch 3, turn. Row 9- 1 dc in each stitch across. Ch 3, turn. Row 10 to 16- 1 dc in each dc across. Fasten off, leaving long tail to sew with.
Right Side of Scarflet- Make Hexagon Edge and follow pattern as for Left Side till you finish row 5. Ch 4, turn. Row 6- 1 tr in each st across. Ch 3, turn. Row 7- 1 dc in each stitch across. Ch 4, turn. Row 8- 1 tr in each dc across. Ch 4, turn.
Row 9- Skip next tr, 1 dc in next tr, ch 1, skip next tr, *ch 1, skip next tr, 1 dc in next tr, rep from * across. Ch 3, turn.
Rows 10 to 16- 1 dc in each stitch across. Fasten off. Weave in tail.
Put both pieces together and sew (seam will be to the back of the neck). Fasten off, weave in tail.

Done!
Down To Earth Real Life Story——Very Interesting!
When I Was An Atheist
Best Blog Tips

Flirty Ruffled Blue Warmie

Best Blog Tips


This pretty and easy neck warmie is the thing for someone who loves to wear denim, even in the winter. Fast to make and very feminine, you will love the way it wears. The soft blue and the ruffles combine to give this warmie a gentle feminine look.

Materials:
Red Heart worsted weight yarn Light Blue
Size H crochet hook

Ch 20.
Row 1- 1 dc in 4th ch from hook and in each ch across (17 dc). Ch 3, turn.
Note- Ch 3 counts as 1 dc.
Row 2- 1 dc in each ch from across. Ch 3, turn. Rows 3 to 8- Rep row 2. Ch 4, turn. (Ch 4 counts as 1 tr).
Row 9- 1 tr in each of next 5 dc, ch 8, skip 8 dc, 1 tr in next dc, 1 tr in each of next 4 dc (keyhole made). Ch 3, turn.
Row 10- 1 dc in each of next 4 dc, 1 dc in each of next 8 ch, 1 dc in each of next 4 dc, 1 dc top of turning ch. Ch 3, turn. Rows 11 to 42- 1 dc in each dc across. Fasten off, weave in tail.
Ruffles:
Note- You work the ruffles with the end of the warmie facing you and you make each dc shell on the post of the specific dc.
Ruffle Row 1- (This will be an edging) Sl st to join yarn on 1st dc one of the ends of the neck warmie, ch 3, make 3 dc in same spot, skip 2 dc, 1 sc in next dc, skip 2 dc, *make 5 dc in next dc,
skip 2 dc, make 1 sc in next dc, skip 2 dc, make 5 dc in next dc, rep from *, ending row with 4 dc in top of turning chain. Fasten off, weave in tails.
Ruffle Row 2- Skip 1 row of dc, and start this ruffle row across next row of dc posts as follows:
Sl st on post of 1st dc of dc row, ch 3, 3 dc in same post, skip 2 dc, 1 sc on post of next dc, *skip 2 dc, 5 dc on post of next dc, skip 2 dc, 1 sc on post of next dc, rep from * across. End row with 4 dc in post of last stitch of row. Fasten off. Weave in tails.
Ruffle Row 3- Skip 1 dc row. Rep Ruffle Row 2 across posts of next dc row. Fasten off, weave in tails.
Ruffle Row 4- Skip next dc row. Rep Ruffle Row 2 across posts of next dc row. Fasten off, weave in tails.Repeat all Ruffle rows on opposite end of Warmie. Fasten off. Weave in tails.
You're done!


Common Bible Questions People Are Interested In
Best Blog Tips

In the Woods Neck Warmer

Best Blog Tips


This is an easy, comfortable, keyhole warmie for your rugged moments. If you are outdorsy and like a scarf that stays put and is lovely and feminine, this one's for you!

Materials: Red Heart worsted weight yarn Dark Sage Crochet hook size H


Scissors Blunt needle Note 1- Ch 3 counts as 1 dc throughout. Note 2- The reason for 2 bottom pieces is that I like identical ends. If you were to continue the pattern and reproduce the bottom on the other side, it would be upside down while the opposite end would be right side up. Note 3- Do not fasten off 2nd bottom as you will the first one. Bottom Blocks (make 2)- Ch 24. Row 1- 1 dc in 4th ch from hook and in each ch across (22 sts). Ch 4, turn. Row 2- Skip 1 dc, 1 dc in each of next 3 dc, ch 1, skip 1 dc, 1 dc in next dc, ch 4, skip 4 dc, 1 sc in next dc, ch 4, 1 dc in next dc, ch 1, skip 1 dc, 1 dc in each of next 3 dc, ch 1, skip 1 dc, 1 dc in last stitch of row. Ch 4, turn. Row 3- Skip to next dc, 1 dc in that dc and in each of next 2 dc, ch 1, 1 dc in next dc, ch 3, yo, insert hook in next ch, pull up loop and proceed to begin a dc, but leave it unfinished on hook, repeat on top of sc and in next ch, yo, pull yarn through all loops on hook (cluster made), ch 3, 1 dc in next dc, ch 1, 1 dc in each of next 3 dc, ch 1, 1 dc in top of beginning ch. Ch 4, turn. Row 4- 1 dc in next dc, ch 1, 1 dc in each of next 3 dc, ch 4, 1 sc in top of cluster, ch 4, 1 dc in next dc, ch 1, 1 dc in each of next 3 dc, ch 1, 1 dc in top of turning ch. Row 5- Rep row 4. Ch 4, turn. Row 6- Rep row 3. Ch 4, turn.

Row 7- 1 dc in each of next 3 dc, ch 1, 1 dc innext dc, ch 3, 1 hdc in top of cluster, ch 3, 1 dc in next dc, ch 1, 1 dc in each of next 3 dc, ch 1, 1 dc in top of turning ch. Ch 4, turn. Row 8- 1 dc in each of next 3 dc, ch 1, 1 dc in next dc, ch 1, 1 dc in each of next 2 ch, 1 dc in next hdc, 1 dc in each of next 2 ch, ch 1, 1 dc in next dc, ch 1, 1 dc in each of next 3 dc, ch 1, 1 dc in top of turning ch. Ch 4, turn. Row 9- 1 dc in each of next 3 dc, ch 1, 1 dc in next dc, ch 1, 1 dc in each of next 5 dc, ch 1, 1 dc in next dc, ch 1, 1 dc in each of next 3 dc, ch 1, 1 dc in top of turning ch. Ch 3, turn. Row 10- 1 dc in each dc and in each ch across. Ch 4, turn. Row 11- Skip 1 dc, dc, 1 dc in next dc, *ch 1, skip 1 dc, 1 dc in next dc, rep from * across. Ch 3, turn. Row 12- 1 dc in each dc and in each ch across. Fasten off, weave in tail. Make second bottom piece. Row 13- Working in 2nd bottom piece, ch 3, skip 1 dc, 3 dc, ch 2, 1 dc in next dc, skip 4 dc, *3 dc, ch 2, 1 dc in next dc, skip 4 dc, rep from * across, 1 dc in last st of row. Ch 3, turn. Row 14- Skip till you reach first ch-2 space, make 3 dc, ch 2, 1 dc, in that ch-2 space, *3 dc, ch 2, 1 dc in next ch-2 space, rep from * across, end with 1 dc in last st. Ch 3, turn. Rows 15 and 16- Rep row 14. Ch 3, turn. Row 17- 1 dc in each dc and in each ch-2 space across. Ch 4, turn. Row 18- 1 Tr in each of next 5 dc, ch 9, skip 9 dc, 1 tr in next dc, 1 tr in each dc till end of row (keyhole made). Ch 3, turn. Rows 19 to 21- Rep rows 14 to 16. Row 22- Rep row 17. Rows 23 to 25- Rep rows 14 to 16. Row 26- Rep row 17. Rep rows 14 to 17 twice more. Rep rows 14 to 16 once more, fasten off (do not make row 17!) Sew the other piece which ends in a dc row to this piece. Fasten off, weave in tail. You're done!


Best Blog Tips

Spiky Little Neck Warmer

Best Blog Tips


This is another convertible piece for your cool Season wear. This contemporary neckwarmer is textured and nice and it works up really fast! It is really fun and I decided to show it in all the ways that you can wear it. It converts from a neck warmer into a neckie and back. Make it in your favorite color and let me know how you liked it.


Materials:
Worsted weight blue yarn
Crochet hook size H
4 shirt-size buttons mathing yarn (which would go easily thorugh dc sts)
blunt needle
scissors
Ch 49 with Blue and H hook.
Row 1- 1 dc in 4th chain from hook and in each ch across. (47 dc).
Row 2- 1 dc in each of next 3 dc, 1 hdc in next dc, 1 tr in next dc, 1 sc in next dc, *1 tr in next dc, 1 sc in next dc, rep from * across, stopping this stitch 6 sts from end of row. Now, proceed as follows: 1 hdc, 1 dc in next dc and in each dc to end of row. Ch 3, turn. Row 3-1 dc in each st across. Row 4- Rep row 2. Row 5- Rep row 3.


Continue alternating these two rows until you have completed 9 rows, ending with a dc row. Fasten off, weave in tails.
Make a shell trim for buttonholes as follows: Join yarn to the narrow edge of the neck warmer, ch 3, make 2 dc in same spot as ch 3, skip a little space, make 1 sc, skip a little space, make shell of 4 dc in next space, *skip a little space across and make 1 sc, skip a little bit, eyeballing it and make a shell of 4 dc, rep from * across. Fasten off and weave in tail. Sew 4 buttons on the opposite narrow edge of the neck warmer which will use these shells as buttonholes (you could do 5 if you wanted, because you are going to wind up with 5 shells, but I left the middle one without a button and it wourld out really well, choose a size of button that pushes easily in between dc stitches but stays secure and doesn't open up afterwards.)
That's it!

Can A Saved Man Choose To Be Lost?


....................
Thank you Toqua's Crafts for Posting Spiky Little Neck Warmer on your site! I went and took a peek and it looks very pretty on you!
Toqua's Crafts


Best Blog Tips

Woodsy Cozy

Best Blog Tips


This one is super-easy but it looks really good!
Materials:

Red Heart worsted weight Woodsy
Red Heart worsted weiight Coffee (scraps)
Crochet hook size H

Note: Ch 3 counts as 1 dc throughout.

Ch 93.
Row 1- 1 dc in 4th ch from hk and in each ch across. (91 dc). Ch 3, turn. Row 2- 1 dc in each of next 5 dc, ch 1, skip 1 dc, 1 dc in next dc, ch 1, skip 1 dc, 1 dc in next dc, ch 1, skip 1 dc, 1 dc in next dc, ch 1, skip next dc,*1 dc in each of next 6 dc, ch 1, ch 1, skip 1 dc, 1 dc in next dc, ch 1, skip 1 dc, 1 dc in next dc, ch 1, skip 1 dc, 1 dc in next dc, ch 1, skip next dc, rep from * till end of row. Finish row as follows: ch 1, skip 1 dc, 1 dc in next dc, ch 1, skip 1 dc, 1 dc in next dc, ch 1, 1 dc in each of last 2 dc. Ch 3, turn.
Row 3- 1 dc in next dc, ch 1, skip 1 dc, 1 dc in next dc, ch 1, skip 1 dc, 1 dc in next dc ch 1, *1 dc in each of next 6 dc, ch 1, ch 1, skip 1 dc, 1 dc in next dc, ch 1, skip 1 dc, 1 dc in next dc, ch 1, skip 1 dc, 1 dc in next dc, ch 1, skip next dc, rep from * till end of row. Ch 4, turn. Row 4- Skip next dc, 1 dc in next dc, ch 1, skip 1 dc, 1 dc in next dc, ch 1, skip 1 dc, *1 dc in each of next 6 stitches (ch 1 spaces and dc included), ch 1, skip ch 1 space, 1 dc in next dc, ch 1, skip 1 dc, 1 dc in next dc, ch 1, skip 1 dc, 1 dc in next dc, ch 1, skip 1 dc, rep from * across to end of row. Finish row by making 1 dc in each of last 7 sts (dcs and ch 1s included). Ch 3, turn.
Row 5- Rep row 4. Ch 3, turn. Row 6- 1 dc in each of next 5 dc, ch 1, skip 1 dc, 1 dc in next dc, ch 1, skip 1 dc, 1 dc in next dc, ch 1, skip 1 dc, 1 dc in next dc, ch 1, skip next ch-1 space, 1 dc in each of next 6 stitches (dcs and ch-1 spaces included), *ch 1, skip 1 dc, 1 dc in next dc, ch 1, skip 1 dc, 1 dc in next dc, ch 1, skip 1 dc, 1 dc in next dc, ch 1, skip next ch-1 space, 1 dc in each of next 6 stitches (dcs and ch-1 spaces included). Rep from * to end of row. End row by making 1 dc in each of last 2 sts.
Row 6- Rep row 5. Ch 3, turn. Row 7- Make 1 dc in each dc and in ch-1 space across. Fasten off. Weave in tials.
Edges- Make a row of sc stitches on both narrow edges of the scarflette to give it a cleaner look. Fastenoff. Weave in tials.
Closure- With Coffee, Ch 20. Slip stitch to form a circle. Ch 3, do not turn. Make 42 dc in circle. slip stitch to close, leaving a long tail to sew with. Lay the cozy in a hard surface to be able to measure it well. Count from edge upwards 18 stitches. Insert the brown circle you just made into the cozy to the level of that 18th stitch, with the side that has the long tail to the back. Sew it in place across the back of that row, leaving free the portion of the circle that faces the right side of the cozy. To close cozy around the neck, simply insert the other side into that open half-circle.
You're done!


"Once I thought to find on earth
Love, perfect and complete.
Now I know it carries wounds
In its hands and feet."
—Anna Hempstead Branch
The Desire of Ages. Considered the most beautiful biography of Christ ever writen.
Listen to it for FREE online!
Best Blog Tips

Chestnut Beauty Scarflette

Best Blog Tips

Elegant, simple and easy to make, this is the perfect short scarf for a neutral accent!

Materials:
Red Heart Warm Brown
Crochet hook size H
Scissors

Ch 35.
Row 1- 1 dc in 4th ch from hook and in each ch across. Ch 3, turn. Note: Ch 3 counts as 1 dc throughout. Row 2- 1 dc in each of next 2 dc, ch 1, skip 1 dc, 1 dc in each of next 7 dc, ch 1, skip 1 dc, 1 dc in next dc, ch 1, skip 1 dc, 1 dc in next dc, ch 1, skip 1 dc, 1 dc in each of next 7 dc, ch 1, skip 1 dc, 1 dc in each of next 4 dc. Ch 3, turn. Row 3- 1 dc in each of next 3 dc, ch 1, skip ch-1 space, 1 dc in each of next 7 dc, 1 dc in ch-1 space, 1 dc in next dc, 1 dc in ch-1 space, 1 dc in each of next 7 dc, ch 1, skip ch-1 space, 1 dc in each of last 3 dc. Ch 3, turn. Continue alternating these 2 rows until you have completed 9 rows. Ch 3, turn. Row 10- 1 dc in each of next 2 dc, ch 1, skip ch-1, 1 dc in each of next 3 dc, ch 2, skip 2 dc, 1 dc in each of next 7 dc, ch 1, skip ch-1 space, 1 dc in each of next 4 dc. Ch 3, turn. Row 11- 1 dc in each of next 2 dc, ch 1, skip ch-1 space, 1 dc in each of next 7 dc, ch 3, skip ch-3 space, 1 sc in each of next 3 dc, ch 3, skip ch-3 space, 1 dc in each of next 7 dc, ch 1, skip ch-1 space, 1 dc in each dc to end of row. Row 12- Rep row 11. Row 13- Rep row 11. Row 14- Rep row 11. Ch 3, turn. Row 15- 1 dc in each of next 3 dc, ch 1, skip ch-1 space, 1 dc in each of next 7 dc, ch 3, 1 dc in each of next 3 sc, ch 3, 1 dc in each of next 7 dc, ch 1, skip ch-1 space, 1 dc in each of last 3 dc. Ch 3, turn. Row 16- Rep Row 15. Ch 3, turn. Row 17- 1 dc in each of next 3 dc, ch 1, skip ch-1 space, 1 dc in each of next 7 dc, 2 dc in ch-3 space, 1 dc in each of next 3 dc, 2 dc in ch-3 space, 1 dc in each of next 7 dc, ch 1, skip ch-1 space, 1 dc in each of last 3 dc. Row 18- Ch 2, while holding last loop on hook, begin a dc nornally and leave unfinished, yo and pull yarn through all loops on hook (dc2tog made), 1 dc in next dc, ignore ch-1 space and make a dc in next dc, 1 dc in each of next 6 dc, ignore ch-1 space, dc2tog, 1 dc in each of next 3 dc, ignore ch-1 space, 1 dc in each of next 3 dc, dc2tog, 1 dc in each of next 4 dc, ignore next ch-1 space, 1 dc in each of last 2 dc. Row 19- Dc2tog at beg of row, 1 dc in each of next 21 dc, dc2tog at tend of row. Row 20- Dc2tog at beg of row, 1 dc in each ofnext 5 dc, dc2tog, 1 dc in each of next 5 dc, dc2tog to end row. Row 21- Dc2tog, 1 dc in each of next 7 dc, dc2tog, 1 dc in each of next 4 dc, dc2tog, 1 dc in each of next 2 dc, dc2tog to end row. Row 22- Dc2tog, 1 dc in each dc across till last 2, dc2tog to end row. Rows 23 to 24- Rep row 23. Ch 3, turn. Row 25 to 63- 1 dc in each dc across. Fastenoff, leaving long tail to sew with. Count 28 rows from row 25 onward, then, at the level of row 28, fold the scarf toward the back and sew across, making a "loop" to close the scarflette around the neck. Fastenoff, weave in tail.
Edging: Join yarn at the bottom of the scarflette and ch 3, 4 dc in same spot, skip 2 dc, 1 sc in next dc, *skip 2 dc, make 5 dc in next dc, skip 2 dc, make 1 sc in next dc, rep from * across, skipping only 1 dc at end of row and making 5 dc in last dc. Fasten off and weave in tail.
Done!


Patriarchs and Prophets, Enjoy the Beautiful Stories of the Old Testament!
Best Blog Tips

Chill-Chaser Warm Tie

Best Blog Tips


Another easy one! This one looks good and is fast and easy to make.


Materials:

Red Heart worsted weight yarn Lipstick
Red Heart worsted weight yarn Claret
1 red button (shirt size or size appropriate to pass comfortably through dc stitches)
Crochet hook size H
Blunt needle
Scissors


Ch 90.
Row 1- 1 dc in 4th ch from hk and in each ch across. (88 dc). Ch 3, turn. Row 2- 1 dc in each dc across. Rows 3 to 4- Rep row 2. Row 5- Ch 4, skip 1 dc, 1 dc in next dc, ch 1, skip 1 dc, *1 dc in next dc, ch 1, skip 1 dc, 1 dc in next dc, rep from * across. End row by making 1 dc in each of last 2 dc. Fasten off, weave in tail. Row 6- Join Lipstick to edge of 1st row. Rep row 5 across that row.
Fasten off, weave in tail. Row 7- Join Claret to turning chain of row 5, ch 3, work 2 dc in each ch-1 space across. Ch 1, sc in each stitch across both narrow ends of the neck warmer, ch 1, turn the other corner and repeat 2 dc in each ch-1 space across. Fasten off, weave in tail.


Measure tie around neck and find a comfortable point for closure, mark, sew button there, using the crocheted fabric both as button band and buttonhole. Cross the ends and close with button.

Read It FREE Online!


Best Blog Tips

Smart Girl Neck Cozy

Best Blog Tips

This is the simplest neck cozy you can make. It is both fit for a beginner and for an expert crocheter.
The expert can take it as a blank slate, a template that can be used to add various fancy edgings that will make it totally gorgeous, while the beginner can achieve a
simple but sleek result, and feel satisfied with the results of her efforts. Try it! It is smart looking yet simple.
Materials:
Rede Heart Carrot (worsted weight acrylic yarn)
Red Heart Cafe
Red Heart Mexicana
4 yellos buttons (about the size of shirt buttons of buttons that would pass comfortably through dc stitches)
Crochet hook size H
With Carrot, ch 88.
Row 1- 1 dc in 4th ch from hk and in each ch across. Ch 3,turn.
Rows 2 to 4- 1 dc in each dc across. Fasten off and join Cafe.
Row 5- Ch 1 (counts as 1 sc), 1 sc in each st across.Ch 3, turn.
Row 6- (Ch 3 counts as 1st dc), 1 dc in each of next 4 dc, skip 1 sc, 1 dc,ch 1, 1 dc in next dc, skip 1 sc, *1 dc in each of next 5 dc, skip 1 sc, 1 dc, ch 1, 1 dc in next dc, skip next sc, 1 dc in each of next 5 dc, rep from * across. Finish row with 1 dc in each of last 6 dc.
Ch 3, working on the width of the tie, sc all across the width on that side, ch 1.
Row 7- Turn the corner and sc all across the length of the scarf on the opposite side. When you reach the corner, slip st all across the width of the scarf, sl st to join the row when you reach the top of the ch-3 beginning chain of that side row. Ch 1, turn.
Row 8- Sc all across the width (on top of the slip stitches) until you reach the other side. Ch 3.
Row 9- 1 dc in each of next 5 (on top of previously made sc row), skip 1 sc, 1 dc, ch 1, 1 dc in next stitch, skip next st, 1 dc in each of next 5 sts, skip 1 st, 1 dc, ch 1, *1 dc in next st, skip next st, 1 dc in each of next 5 sts, rep from * across, end row with 1 dc in each of last 7 sts. Fastenoff, weave in tail.
Row 10- Join Mexicana to any corner and sc all around. If you want to, yo may do an extra row with little picots. Fasten off. Weave in tails.
You're done!
Hope you enjoy this pattern.
Love this blog? Share it!

Read FREE Online:
The Power Of A Positive NO
Best Blog Tips

Going to Work Necktie

Best Blog Tips


This is the simplest and fastest necktie I've made! (So far. . .) You can make it in one sitting if you are a fast crocheter. I tried to make it attractive but really straightforward. If you love neckties but have never made one because thy intimidate you, start with this one!

Materials:
Red Heart worsted weight yarns in the following colors:
Claret
Burgundy
Cherry Red
Crochet hook size H
Blunt needle


Body of necktie:
With Burgundy, ch 71. Row 1- 1 sc in 2nd ch from hk and in each ch across. Ch 1, turn. Note: Ch 1 counts as 1 sc in each row. Rows 2 to 4- 1 sc in each sc across.Ch1, turn. Rows 5 to 6- 1 sc in each sc across. (Note- Each ch 1 and each ch 2 counts as 1st at beg of row).Fasten off, weave in tail. Join Cherry Red. Rows 5 to 9- 1 sc in each sc across. Fasten off. Weave in tail. Join Claret. Rows 10 to 14- 1 sc in each sc across. Ch 1.

Pocket- Still working with Claret- Row 1- Turn the corner and begin to work widthwise. 1 sc in each st across the width of the crocheted necktie (14 sc.)Ch 1, turn. Row 2- 1 sc in each sc across. Ch 3, turn (counts as 1st st.) Rows 3 to 10- 1 dc in each sc across. Ch 3, turn. After last row, fasten off leaving a long tail to sew with. Fold backwards, placing hte edge of the pocket on top of the 1st sc row across the width. Thread the blunt needle and sew pocket along this first row. Fasten off.
Join Claret to opposite end of the necktie. Row 1-Sc across the width as well. (14 sc.)Ch 1, turn. (each ch 1 counts as 1 sc.) Rows 2 to 11- 1 sc in each sc across. Fasten off. Weave in tail.
Now join Burgundy to the long part of the necktie (over the Claret side). Row 1- 1 sc, 1 hdc, 1 dc in next stitch, 1 dc in each stitch across untilyou reach the last 2 sts, then make 1 hdc, and end with 1 sc. Ch 1, turn. Row 2- Mke 1 sc in each sc across. Fasten off, weave in tail. Join Claret on the opposite side, still working on the long side of the necktie, over the Burgundy rows and rep the last 2 rows made with the Claret yarn. Fasten off, weave in tails.
Five-Sided granny (Pentagon) (Make 2):
With Claret, Ch 4, sl st to join. Rnd 1-Ch 3 (counts as first dc), 2 dc in chain loop, *ch 2, 3 dc* rep from * 4 times. Ch 1, Sl st to nearest ch-2 space, ch 3 there. Rnd 2-Ch 3, 2 dc in same space, *ch 1, 3 dc in next ch-2 space, ch 2, 3 dc in next ch-2 space*; repeat from * 4 times. Ch 1, 3 dc in next ch-2 space. Ch 1, sl st at beginning chain to join rnd. Rnd 3-Ch 3, 2 dc in same space, *ch 1, 3 dc in next ch-2 space, ch 1; 3 dc in next ch-2 space, ch 2, 3 dc in next ch-2 space*; repeat from * 4 times. Ch 1, 3 dc in next ch-2space. Ch 1, slip st in beg ch 3. Fasten off leaving long tail to sew with.
Edging- With Cherry Red, sc all around the necktie. Be careful when you reach the "pocket", sc only on the outward part of it, not the bottom and make sure you do not "seal it shut" when you sc over it!

That's it, your're done!

............................................

Keep The Best Communications Lines Open!
Teach Us To Pray
Best Blog Tips

Elegant Warming Collar

Best Blog Tips


This beautiful lacy warming collar, crafted with a neutral colored yarn will go well with anything you can put on!

Materials:
Red Heart Soft Brown
Crochet hook size G

Ch 40.
Row 1- 1 dc in 6th ch from hk (ch 1, skip next ch, 1 dc in next ch) rep 7 times, ch 1, skip next ch, 1 dc in each of next 19 ch, ch 7, turn. Row 2- 1 dc in first dc, 1 dc in each of next 18 dc, ch 1, 1 dc in next dc, ch 1, 1 dc in next dc, ch 7, skip next 3 dc, 1 dc in next dc (across from the 3 dc you just skipped), ch 1, 1 dc in next dc, ch 1, 1 dc in last dc, ch 4, turn. Row 3- 1 dc in 1st dc, 1 dc in next dc, ch 1, 1 dc in next dc, skip 1 ch, 1 dc in each of next 5 ch, ch 1, skip 1 ch, 1 dc in next dc, ch 1, 1 dc in next dc, ch1, 1 dc in each dc to end of row. Ch 7, turn.
Row 4-1 dc in first dc, 1 dc in each of next 18 dc, ch 1, 1 dc in next dc, *ch 1, 1 dc in next dc, rep from * up to end of row. Ch 4,turn.
Continue alternating rows 2, 3 and 4 for pattern until you have completed a total of 33 rows. Ending with a row 4.
Note, the collar is folded over itself, the lacy part folded over the solid stitches.
Edging: Join yarn to the edge of the solid dc side and ch 3, in same spot, make 3 dc, skip 1 st, make 1 sc in each of next 3 sts, skip 1 st, make 1 four dc shell in next st, *skip 1 st, make 1 sc in each of next 3 sc, skip 1 st, make 1 four dc shell in next st, skip 1 st, make 1 sc in each of next 3 sts, rep from * across. Fasten off, weave in tail.
In lace edge,where the long loops are, join yarn. Ch 3, make a 4-dc shell in first long loop, ch 3, make 1 sc in the horizontal-lying post of dc of prev row (the stitch that lies in between the loop you just worked and the next long loop), ch 3, make 4-dc shell in next long loop, ch 3, 1 dc in next st, *ch 3, 4-dc shell in next long loop, ch 3, 1 sc in next st, rep from * across. Faste off. Weave in tail.
Ties-Fold the collar over itself and, just at the point in which the solid dc sts end and the lace sts start, "tack" both sides together by inserting the hook through both sets of loops even as you join the yarn the make the first tie, secure the "tack" with a slip st. Ch 36. Fan-Place a marker on the last chain. Chain 3, make 4 dc in chain where marker is (5-dc shell made). At the end of the last dc of this shell, chain 11, turn. Row 2- Working on back loops only, make 1 dc in 4th ch from hk, 1 dc in each of next 2 ch, 1 hdc in each of next 2 ch, 1 sc in next, sl st in rop od 2nd dc of shell base. Ch 1, turn. Row 3- Working in back loops only, 1 sc in 1st sc, 1 hdc in each hdc, 1 dc in each dc across. Ch 3, turn. Row 4-Working in back loops only, make 1 dc in each dc, 1 hdc in each hdc, and 1 sc in top of sc of prev row, sl st in top of shell base. Ch 1, turn. Continue repeating these last 2 rows until you complete 8 rows for the fan. Fasten off. Weave in tail. Repeat the same procedure for the other side of the collar.
You're done!

Would you like to listen to a wonderful, inspired commentary on the Beatitudes? The beautiful blessings of Jesus come alive and they will have greater meaning for you. Listen ot it FREE online!
http://www.ellenwhiteaudio.org/en/mb/
Best Blog Tips

Crunchy Stitch Neck Cozy

Best Blog Tips

I came up with this stitch while tinkering with my hook and starting to make this neck cozy. Since it has some texture to it, I named it Crunchy stitch. It is very easy to make.
Materials:

Red Heart Hunter green
G crochet hook
3 green buttons about the size of a dime
green sewing thread
sewing needle
measuring tape
scissors

with G Ch 16. Row 1- 1 sc in 2nd ch of hk and in every ch across. Ch 3, turn (counts as 1 dc throughout). Row 2- 1 dc in each sc across. Row 3- 1 sc and 1 dc in first dc, skip next dc, 1 sc and 1 dc in next dc, *skip next dc, 1 sc and 1 dc in next dc, rep from * across until you reach the last stitch. Work 1 dc and 1 sc (inverted) in that last stitch. Ch 1, turn. Row 4- 1 sc in each sc across. Continue alternating rows 2 to 4 for pattern. Continue in this manner until your neck cozy measures 23-1/2 inches long,(or 59 rows) ending with a dc row. When you reach the end of your last row, ch 1, and insert the hook in the same dc you just made. Row 60- Make 1 row of sc across the edg widthwise.
Edging: Row 61- Ch 3, turn, 1 dc in each of next 2 sc, ch 3 skip 3 sc, *1 dc in each of next 3 dc, ch 3, skip 3 dc, rep from * across. Row 62- Ch 3, turn. Skip last 2 dc of prev row and make 4 dc in ch-3 space , * ch 3, skip next dc, make 1 sc in next dc, skip next dc, ch 3, make 4 dc in next ch-3 space, rpe from * across. Finish with 1 sc inthe middle of last 3-dc group from prev row. Fasten off. Hide tail. Place one end of the neck cozy over the other, crossing it and measure where you want your buttons to be placed. Sew the buttons on the side that would be underneath when you cross the cozy to close it up, place them so that the dc row that crosses over the buttons will serve as buttonholes.
You’re done!

Times are challenging. Do you feel discouraged sometimes? "In nature itself are mesages of hope and comfort. There are flowers upon the thistles, and the thorn are covered with roses." Steps to Christ, page 10.Would you like to read this book for free? It is the second most translated book in the world andone of the most beloved books by Christians around the globe. Printed in more than seventy languages, and bringing encouragement and inspiration to men and women for generations! Read it for free online:
http://www.stepstochrist.us/
Another site where you will find important answers to soul questions.
http://www.bibleuniverse.com/home.aspxhttp://www.bibleinfo.com/http://www.amazingfacts.org/Default.aspxNeed encouragement, comfort or cheer? Look in here!http://www.frontiernet.net/~rexfam/kingfam1_001.htm
Best Blog Tips

Ladder Shells Neck Warmer

Best Blog Tips

Materials:
Worsted weight yarn (I used Red Heart Blue)
G size crochet hook
Blunt needle

Ch 26.
Row 1 (Right Side): Dc in 4th chain and in each of the next 2 chains, skip nest 2 chs and make 5 dc in next chain, chain 2, skip next 3 chains, amd make a dc in each of next 4 chains, repeat this twice. Ch 3, turn.
Row 2 (Wrong Side): 1 dc in each of next 3 dc, make 5 dc in next dc, skipping prev row ch 2 space, ch 2, skip next 4 dc,, make 5 dc in next dc, ch 2, skip next 4 dc, dc in each dc to end of row and in top of beg ch 3.
Continue to repeat row 2 until neck warmer measures 12 inches (20 complete rows of lace pattern). Ch 2, turn.
Row 21: Make 1 hdc in each stitch (including ch 2 spcaes) across. Ch 1, turn.
Row 22: Make 2sc tog at beg of row, 1sc in each of next 4 sts, 2sc tog, 1 sc in each of next 4 sts, 2sc tog, 1 sc in each of hte following sts until you reach the last sts of the row, end row with 2sc tog. Ch 1, turn.
Row 23: 2sctog at beg of row, 1 sc in each of next 6 sc, 2 sctog, 1 sc in each of next 4 sc, 2sctog, 1 sc in each sc till you reach last 2 sc or row, make a 2sctog to end row. Ch 1, turn.
Row 24: 2sctog to start row, 1 sc in each of next 5 sc, 2sctog, 1 sc in each of next 5 sc, 2 sctog to end row. Ch 1,turn.
Row 25: 2sctog to start row, 1 sc in each sc across till you reach the last 2 sc, 2sctog to end row. Ch 1, turn.
Rows 26-27: Rep row 25.Ch 1, turn.
Row 28: 1 sc in each sc across (no decreases). 8 sc made. At the end of the row (after you have made the last sc2tog), ch 31.
Row 29: 1 sc in 3rd ch from hk and in each ch across until you reach again, the sc already made on the neck warmer. (DO NOT TWIST THE CHAIN AS YOU WORK!) Make 1 sc in each of the 8 sc remainng on the neck warmer. Ch 1, turn.
Row 30: 1 sc in each sc across (including strip made on the side of neck warmer). Fasten off, leaving long tail to sew.
Row 31: Join yarn at short edge of neck warmer on the opposite side to the long strip you just made. Make 2 sc in first sc, 1 sc in each of next 2 sc, 2 sc in next sc, 1 sc in each of next 2 sc, 2 sc in next sc, 1 sc in next sc. (10 sc made). Ch 1, turn.
Row 32: Rep row 31. Row 33: 1 sc in each of first 5 sc, 2 sc in next sc, 1 sc in each of next 5 sc, 2 sc in next sc, 1 sc in each sc to end of row. Row 34: 1 sc in each of first 8 sc, 2 sc in next sc, 1 sc in each sc to end of row. Ch 1, turn.
Row 35: 2sc at beg of row, 1 sc in each of next 4 sc, 2 sc in next sc, 1 sc in each of next 4 sc, 2 sc in next 2sc, 1 sc in each sc till you reach the last sc, 2 sc in last sc. Ch 1, turn.
Row 36: 1 sc in each of first 10 sc, 2 sc in next sc, 1 sc in each of next 5 sc, 2 sc in next sc, 1 sc in each sc to end of row. Ch 1, turn. Row 37: 2 sc to beg row, 1 sc in each sc across till you reach last sc, 2 sc in last sc. (26 sc made). Ch 3, turn.
Row 37: 1 dc in each of next 3 sc, skip next 3 sc, 5 dc in next dc, ch 2, skip next 3 sc, 1 dc in each of next 4 sc, skip 3 sc, 5 dc in next sc, ch 2, skip 3 sc, 1 dc in each of last 4 dc. Ch 3, turn.
Row 38: 1 dc in each of next 3 dc, make 5 dc in next dc, skipping prev row ch 2 space, ch 2, skip next 4 dc,, make 5 dc in next dc, ch 2, skip next 4 dc, dc in each dc to end of row and in top of beg ch 3.
Rep row 38 until you have completed 6 rows of lace. Fasten off.
Join yarn to the other end of the neck warmer.
Row 39: Ch 2, 1 hdc in each st across, including chains. Ch 1, turn.
Row 40: Make 2sc tog at beg of row, 1sc in each of next 4 sts, 2sc tog, 1 sc in each of next 4 sts, 2sc tog, 1 sc in each of hte following sts until you reach the last sts of the row, end row with 2sc tog. Ch 1, turn.
Row 41: 2sctog at beg of row, 1 sc in each of next 6 sc, 2 sctog, 1 sc in each of next 4 sc, 2sctog, 1 sc in each sc till you reach last 2 sc or row, make a 2sctog to end row. Ch 1, turn.
Row 42: 2sctog to start row, 1 sc in each of next 5 sc, 2sctog, 1 sc in each of next 5 sc, 2 sctog to end row. Ch 1, turn.
Row 43: 2sctog to start row, 1 sc in each sc across till you reach the last 2 sc, 2sctog to end row. Ch 1, turn.
Rows 44-45: Rep row 25.Ch 1, turn.
Row 46: 1 sc in each sc across (no decreases). 8 sc made. Row 47: Rep row 46. Row 48: Rep row 46.
Rows 47-50: 2s in first sc of row, 1 sc in each sc across, 2 sc in last sc of row.
Row 51: 2 sc at beg of row, 1 sc in each of next 3 sc, 2 sc in next sc, 1 sc in each of next 4 sc, 2 sc in next sc, 1 sc in each of next 4 sc, 2 sc in last sc. Ch 1, turn.
Row 52: 1 sc in each of first 5 sc, 2 sc in next sc. I sc in each sc to end of row. Ch 1, turn. Row 53: 2 sc in first sc of row, 1 sc in each of next 3 sc, 2 sc in next sc, 1 sc in each of next 3 sc, 2 sc in next sc, 1 sc in eac of next 3 sc, 2 sc in next sc, 1 sc in each of next 3 sc, 2 sc to end row. Ch 1, turn. (26 sc made.)
Row 54: 1 dc in each of next 3 sc, skip next 3 sc, 5 dc in next dc, ch 2, skip next 3 sc, 1 dc in each of next 4 sc, skip 3 sc, 5 dc in next sc, ch 2, skip 3 sc, 1 dc in each of last 4 dc. Ch 3, turn.
Row 55: 1 dc in each of next 3 dc, make 5 dc in next dc, skipping prev row ch 2 space, ch 2, skip next 4 dc,, make 5 dc in next dc, ch 2, skip next 4 dc, dc in each dc to end of row and in top of beg ch 3.
Rep row 55 until you have completed 6 rows of lace. Fasten off.
Weave in tails. Pick up blunt needle and with the long tail you left to sew the strip made on the opposite side of neck warmer. Place the crocheted strip across the portion of the shell end as shown in photo and sew the end at the back. Fasten off. Clean up all loose threads.
You're done!


If you enjoy this blog, don't keep it to yourself! Let your friends know about it! To keep up with all of my patterns and crocheting related articles, join my wonderful subscribers! Please, visit my other blogs, leave me a comment. I love to receive feedback.
Times are challenging. Do you feel discouraged sometimes? "In nature itself are mesages of hope and comfort. There are flowers upon the thistles, and the thorn are covered with roses." Steps to Christ, page 10.Would you like to read this book for free? It is the second most translated book in the world andone of the most beloved books by Christians around the globe. Printed in more than seventy languages, and bringing encouragement and inspiration to men and women for generations! Read it for free online:
http://www.stepstochrist.us/
Another site where you will find important answers to soul questions.
http://www.bibleuniverse.com/home.aspxhttp://www.bibleinfo.com/http://www.amazingfacts.org/Default.aspxNeed encouragement, comfort or cheer? Look in here!http://www.frontiernet.net/~rexfam/kingfam1_001.htm
Best Blog Tips

Shell And Bar Tie-Up Scarflette

Best Blog Tips

I find neck warmers easier and faster to make than long scarves. I like them both, but when it is the season to give and you are making a bunch of them and honestly want to make some tracks, neck warmers are the smarter choice of them both, at least for me.
I am making all the neck warmers I am sharing here to give away, so, if you are looking for nice patterns to do the same, here's another find! The uniqueness of this one is that it ties up around your neck like a hankie.

Materials:
Worsted Weight yarn (I used Read Heart Hunter Green)
Size h crochet hook
Blunt needle
scissors
2"-long piece of cardboard
ruler or measuring tape

Chain 30 loosely.
Row 1-In 6th ch from hook make 2 dc, ch 2, 2 dc, * skip 2 ch, 1 dc in each of next 2 ch, skip next 2 chs, work 2 dc, ch2, 2 dc in next ch; rep from * across till you reach the last 3 chains, then, skip two chains and make 1 dc in last chain of row.
Row 2- Ch3 (counts as 1 dc throughout), 2 dc, ch 2, dc in ch-2 space of first shell, 1 dc in top of each of next 2 dc, *2 dc, ch 2, 2 dc in ch-2 space of next shell, 1 dc in each of next 2 dc, repeat from * across, 1 dc in each of last 3 dc.
Row 3- Ch 3, 1 dc in each of next 2 dc, 2 dc, ch 2, 2 dc in ch-2 space of first shell, 1 dc in each of next 2 dc, *2 dc, ch 2, 2 dc in ch-sp of next shell, 1 dc in each of next 2 dc, rep across till last st, 1 dc inlast st. Ch 3, turn. Rep rows 2 and 3 until you have completed 28 rows.
Row 29- Ch2, leave loop on hook, yo, insert hook in next dc and pull up a loop, yo, pull through loops on hook as if to make a dc, but leave last loops on hook, yo and finish all stitches together. (1 decrease made). Skip 1 dc in shell and make 1 dc in ch-2 center of shell, skip 1 dc of shell and make 1 dc in next dc of shell, 1 dc in each of next 2 dc. Make 1 dec at beg of next shell, 1 dc in middle of ch-2 space of shell, 1 dc in each of next 2 dc of shell, 2 dc in each of next 2 dc. Make 1 dec at beg of next shell, 1 dc in middle of ch-2 space of shell, 1 dc in each of next 2 dc of shell, 2 dc in each of next 2 dc. 1 dc in next dc, 1 dec in next 2 dc to end row. Row 30-Make 1 dec at start of row, 1 dc in each dc to last 2 dc and 1 dec at end of row. Row 31- Rep row 30. Row 31- Work 1 dec at beg of row, make 1 dc in each of next 5 dc, make 1 dec, work 1 dc in each of next 3 dc, 1 dec to end row. Ch 3, turn. Row 32- 1 dec at start of row, 1 dc in each dc across row till you reach the last 2 dc, make 1 dec to end row. Row 33- Make 1 dec at beg of row, 1 dc in each dc till you reach the last 2, make 1 dec to end row. Row 34- 1 dec at start of row , 1 dc in each of next3 dc, 1 dec, 1 dc in next dc, 1 dec at end of row (6 sts left in row). Ch 1, turn. Row 35- 1 sc in each sc across. Row 36- Same as row 35. Ch 1, turn. Rows 36-47: 1 sc in each sc across, working on front loops only. Row 48-1 dec at beg of row, 1 sc in each of next 2 sc, 1 dec at end of row. Row 49-Working on both loops, make 1 sc in each sc across. Row 50- Rep previous row. Row 51- 1 sc at beg of row, 1 dec in next 2 sc, 1 sc at end of row. Rows 52-60: 1 sc in each sc across. Rows 61and 62- Makde 1 dec at start of row, in the middle and at end of row. Rep until you only have 1 st left. Fasten off, weave in tail.
Join yarn on other side of scarflette and repeat rows 29 to 62 on the other side. You will have a scarflette with two tying ends to which you will now sew a small tassel.
Tassel:
Cut two strands of yarn and lay them aside. Take your piece of cardboard and wind yarn around it, count the times you wind it so that your tassels will be equally thick. Carefully get your yarn off of the cardboard without mixing the strands and tangling them. Tie one of the strands of yarn you had laid aside around the "head" or topmost side of the would-be tassel. Secure well and then, taking the blund needle, slip both ends of the yarn you have tied it with and slip them under the tie, letting them hang among the tassel yarn. Repeat with the other tassel you need.
Measure them to the size you want with a ruler or a measuring tape, and trim the skirt of the tassel so that all the yarn pieces will have the same length. Do the same with the other tassel.
Take a piece of yarn and thread it through the blund needle, pass it throught he strands at the top of the tassel and sew the tassel to the end of the scarflette's tie. Repeat on the other side.
That's all!
Variations:
You can leave the ties as they are when you are done with the reductions (I always like to embellish) or you can add pompoms instead of tassels. You can also make a pompom tassel or butterfly tassel as follows: Follow the instructions for the tassels as given above. Tie very firmly. When you come to the time to trim your tassel, instead of trimming it in a straight cut all to the same length, trim to different lengths all around as if you were making a pompom. You can make your tassel longer than the one I chose to add to this scarflette. i wanted the tassels to look like little brushes, but if you like longer, classic tassels, make them way.

Are you on Twitter? Would you like to download a FREE App to make your Twittering easier and get some free ads as a reward without becoming a spammer? Download this app which internet marketers are suggesting to their followers. Hey crafter, don't get left behind!
We in the crafting community have to market just as well as others to be seen online and found by our fellow crafters so we can share with one another. Twitter is a great way to share!
You'll never tweet the same way again.Click on this link and download it for FREE! http://tgli.de/CjW
FOLLOW ME ON TWITTER! Just click on the button on the sidebar at the top of this page.

If you enjoy this blog, don't keep it to yourself! Let your friends know about it! To keep up with all of my patterns and crocheting related articles, join my wonderful subscribers!
Times are challenging. Do you feel discouraged sometimes? "In nature itself are mesages of hope and comfort. There are flowers upon the thistles, and the thorn are covered with roses." Steps to Christ, page 10.Would you like to read this book for free? It is the second most translated book in the world andone of the most beloved books by Christians around the globe. Printed in more than seventy languages, and bringing encouragement and inspiration to men and women for generations! Read it for free online:


Another site where you will find important answers to soul questions.

Best Blog Tips

Boxy Neck Warmer

Best Blog Tips


Easy as they come and nice to boot! If you are making little gifts to delight your friends for the Holidays, this one might qualify for your list! An added bonus is the little frog closure which you can easily learn to make and which will be very useful for many other things, such as purses, shoulder swraps, cardigans, you name it!
Note- Because some of you were asking me questions about this neck warmer. I took out the previous pattern and remade it completely new. In a simpler format that is even easier than the first but has the same handsome results. (Please, do not ask for the previous pattern, it has been deleted!)
Materials:
Worsted weight yarn of your choice (I used Red Heart Claret for the neck warmer and a little bit of Red Heart Lipstick for the frog-style closure.)
G hook
tapestry needle
button of your choice
of your choice
Ch 30 loosely.
Note 1- Ch 3 stands for 1st dc of row throughout.
Note 2- ALWAYS work your edging loops on a right side row.
Row 1- Dc in 4th ch from hk and in each chain across. Ch 3, turn.(28 dc)
Row 2- 1 dc in each dc across. Ch 3, turn.
Row 3- 1 dc in each of next 2 dc, ch 3, skip 2 dc, 1 dc in each of next 3 dc, ch 3, skip 2 dc, 1 dc in each of next 8 dc, ch 3, skip 2 dc, 1 dc in each of next 3 dc, ch 3, skip 2 dc, 1 dc in each of next 3 dc. Ch 3, turn.
Row 4- 1 dc in each of next 2 dc, ch 3, 1 dc in each of next 3 dc, ch 3, 1 dc in each of next 3 dc, ch 3, skip 2 dc, 1 dc in each of next 3 dc, ch 3, 1 dc in each of next 3 dc, ch3, 1 dc in each of last 3 dc. Ch 3, turn.
Row 5- 1 dc in each of next 2 dc, ch 3, 1 dc in each of next 3 dc, ch 3, 1 dc in each of next 3 dc, 2 dc in ch-3 sp, 1 dc in each of next 3 dc, ch 3, 1 dc in each of next 3 dc, ch 3, 1 dc in each of last 3 dc. Ch 3, turn.
Row 6- Rep row 4. Ch 3, turn.
Row 7- Rep row 5 . Ch 3, turn.

Rows 8 to 34- Rep row 4 and row 5 alternately. Ch 3, turn.
Row 35- 1 dc in each of next 2 dc, skip first ch of ch-3 space, 1 dc in each of next 2 ch, 1 dc in each of next 3 dc, skip 1st ch of ch-3 sp and make 1 dc in each of next 2 ch, 1 dc in each of next 3 dc, skip 1st ch of ch-3 sp and make 1 dc in each of next 2 ch, 1 dc in each of next 3 dc, skip 1st ch of next ch-s space and make 1 dc in each of next 2 ch, 1 dc in each of next 3 dc, continue this way until you have completed 28 sts across, including beginning ch-3. Chain 3, turn. (28 dc)
Row 36- 1 dc in each dc across.

Row 37- Ch 2, hold loop on hook, yo, insert hook in next dc, pull up a loop, yo, pass yarn through first two loops in next stitch as if to begin a double crochet, yo, finish both stitches together by pulling hte last yarn through all loops that you are holding on your hook. (Decrease or dc2tog made.) Work 1 dc in each of next 10 dc, then, yo, insert hook in next dc and pull up loop as if to make a dc, leave unfinished, yo, repeat with next dc, yo and pull yarn through all loops on hook (dc2tog made), make 1 dc in each of next 10 dc, dc2tog over next 2 dc, 1 dc in each of last 2 dc. (25 dc)


Row 38- Decrease over first 2 dc at start of row, 1 dc in each of next 5 dc, dc2tog over next 2 dc, 1 dc in each of next 5 dc, dc2tog over next 2 dc, 1 dc in each of next 5 dc, dc2tog over next 2 dc, 1 dc in each of last 3 dc. (22 dc)
Row 39- Start with a dec, make 1 dc in each of next 20 dc, 1 dec at end of row. (21 dc)

Row 40- 1 dec at beg of row, 1 dc in each of next 7 dc, dc2tog over next 2 dc, 1 dc in each of next 9 dc, dc2tog over last 2 dc to end the row.(19 dc)
Row 41- 1 decrease at beg of row, 1 dc in each of next 5 dc, dc2tog over next 2 dc, 1 dc in each of next 8 dc, dc2tog to end row. (16 dc)

Row 42- 1 dec at beg of row, 1 dc in each of next 4 dc, dc2tog over next 4 dc, 1 dc in each of next 6 dc, dc2tog over last 2 dc to end row. (13 dc)
Row 43- Decrease at beg of row over first 2 dc, 1 dc in each of next 3 dc, dc2tog over next 2 dc, 1 dc in each of next 3 dc, dc2tog over last 2 dc. (10 dc)
Row 44- 1 Dec at beg of row, 1 dc in each of next 2 dc, dc2tog over next 2 dc, 1 dc in each of next 2 dc, dc2tog over last 2 dc. (7 dc) Ch 3 turn.
Row 45- 1 dc in each of next 6 dc.
Repeat the last 5 rows on opposite side of neck warmer. Make edging on both sides as follows:
Mark last row as Right Side. Loop Edging: Ch 25, sl st in same space, 1 sc in next st, rep across till you reach the last 2 sts, ch 25, slip st in same space, (no sc in between.)Fasten off. Weave in tail.
Join yarn on the other side of neck warmer and rep rows 37 to Loop Edging on that side. Fasten off and weave in tail.

Frog-style closure: With Lipstick yarn and G hook, make a crab stitch braid that is 10 inches long. Fasten off leaving a long tail to sew with.
You can make your closure in several ways, but let's try a simple one. Bend the crab stitch cord you just made in half, take the left leg of that bent cord and cross it over the right side leg, forming a loop, without undoing that loop, insert that same leg of cord into the center of the loop and pull gently, until you have a nice knot that looks almost like a Josephine knot, and two pieces of crab cord at both ends. You are going to bend those two pieces of cord and sew them with the tail you left, one upwards and one downwards, to form your frog. Then you will sew this to the neck warmer at a height that is comfortable to close it around the neck, using the small loops of the crab cord to anchor your stitches. Fasten off. Sew button opposite loop of the frog closure on the other side of the neck warmer. Fasten off.
Note: Since this is a closure and it will pulled ever time the neckwarmer is used, sew your stitches firmly, not tight, but firm so that the pretty frog will not come apart.
You're done!
This pattern has been corrected. Thank you again, Margaret!
Fire-ice-aiken, the pattern is simpler now!


..................


Another site where you will find important answers to soul questions.


Best Blog Tips